第一章 使用多线程 第一节 什么是任务计数 概念:队列中未完成任务的个数,用于跟踪任务的处理进度。 & 额外说明: 每次q.put(x), 就相当于增加一个未完成的任务, q.get()并不能将任务的个数减少, 只能将值弹出去 获取方法:通过 q.unfinished_tasks 属性获取。 第二节 queue在多线程中的常用方法 q.get()功能:从队列中取出一个元素。 对任务计数的影响:只是将值弹出队列,并不会减少任务计数。 q.put(item)功能:将一个元素放入队列中。 对任务计数的影响:增加任务计数,表示有一个新任务加入队列。 q.join()功能:阻塞调用它的线程,直到队列中的所有任务都被标记为完成。 条件:当 task_done() 被调用的次数等于 put() 的次数时,队列中的任务才算完成,此时 join() 方法才会继续执行后续代码。 q.task_done()功能:标记一个任务完成。 对任务计数的影响:减少任务计数。 注意事项:如果任务计数已经为0,再调用 task_done() 会引发错误,因为这意味着没有任务可标记完成。 第三节 作业 使用多线程爬取aqy影视信息(同上)
1.3.1 多线程如何调用 爬虫四步: ①确定URL地址 ②模拟发送请求 ③清洗数据 ④存储数据
1.3.2 多线程体现在哪? 然后在main中(外部调用的那个方法), 我们创建
1.3.3 F&Q 为什么要用True而不是not queue.empty()作为while的条件?
empty()不是线程安全的, 队列可能在检查和获取之间变化, 其他线程可能在这期间添加数据
为什么打印完”持续时间balbal”后, 还会有”插入成功”的打印?
每个方法中的task_done()一定要在最后执行, 因为只要task_done()让”任务计数”为0了, join就会立即生效launch()方法, 只要有这三个队列, 有一个”任务计数”没有到0, launch()方法就不可能结束
one_url = self.url_queue.get()不加锁会导致错误读取吗?
不会, queue的get()的是线程线程安全的(线程安全指的时在执行这个方法时候会锁上当前进程, 从而避免被其他线程操作,就是等同于帮你加锁了)
为什么给save()方法多开几个线程, 不能像get_response_queue()方法开几个线程一样增加运行效率
get_response_queue()方法主要是进行网络请求,这通常是I/O密集型操作。在这种情况下,增加线程数量可以提高并发性,因为当一个线程在等待网络响应时,其他线程可以继续执行请求。
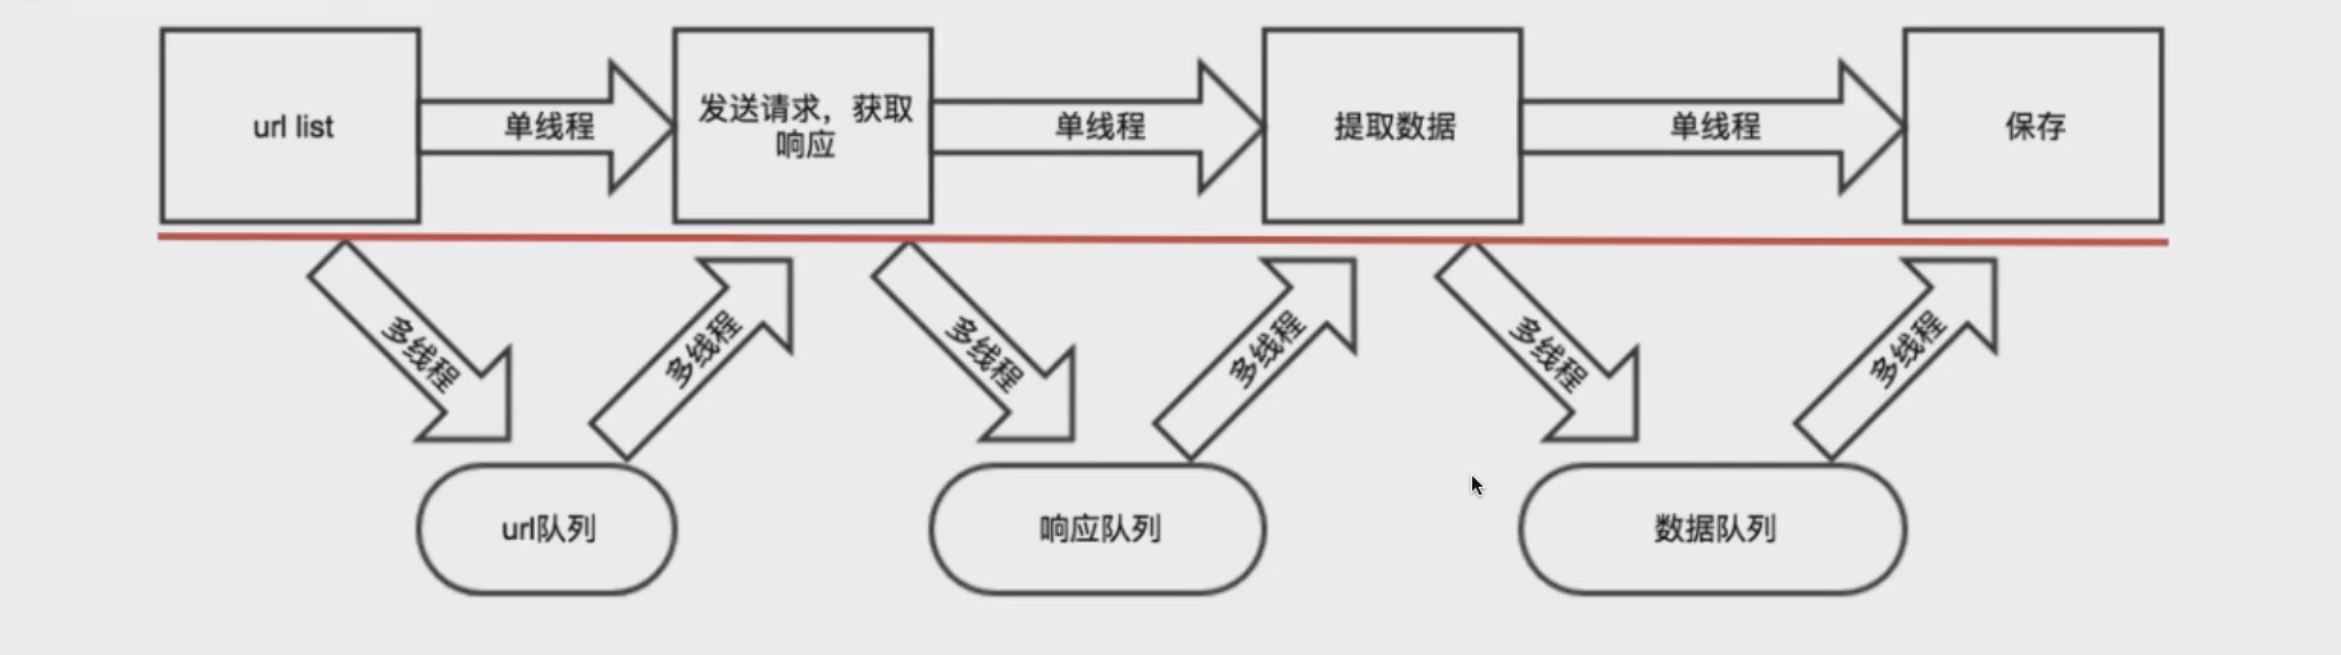
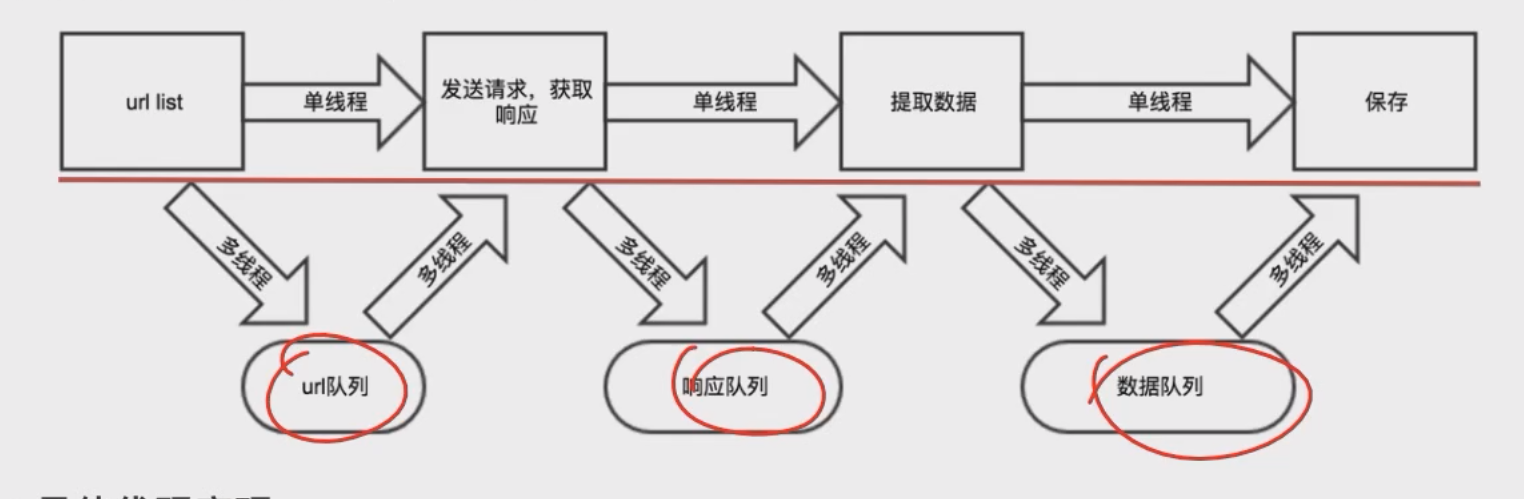
1.3.4 “生产者和消费者”的设计模式 说明: 虽然它本身不是23种设计模式之一,但它是一个广为人知的并发编程模式。在这个模式中,生产者(Producer)和消费者(Consumer)共享一个固定大小的缓冲区。生产者负责生成数据并将其放入缓冲区,消费者则从缓冲区取出数据进行消费。 回顾: PV操作还记得吧; 一个人只管生产, 生产后放到”缓冲区”(市场); 另一个人只管消费,从”缓冲区”获取消费的资源; 这里的缓存区就是那几个队列
ins 1 2 3 4 5 6 7 8 9 10 11 12 13 14 15 16 17 18 19 20 21 22 23 24 25 26 27 28 29 30 31 32 33 34 35 36 37 38 39 40 41 42 43 44 45 46 47 48 49 50 51 52 53 54 55 56 57 58 59 60 61 62 63 64 65 66 67 68 69 70 71 72 73 74 75 76 77 78 79 80 81 82 83 84 85 86 87 88 89 90 91 92 93 94 95 96 97 98 99 100 101 102 103 104 105 106 import requestsimport pymongoimport timeimport threadingfrom queue import Queueclass AQY : aim_url = "https://pcw-api.iqiyi.com/search/recommend/list?channel_id=1&data_type=1&mode=24&" \ "page_id={}&ret_num=48&session=6edd98b29ba0a0950a4d3556849e8506" headers = { 'user-agent' : 'Mozilla/5.0 (Windows NT 10.0; Win64; x64) AppleWebKit/537.36 (KHTML, like Gecko) Chrome/131.0.0.0 Safari/537.36' } TOTAL_PAGES = 10 def __init__ (self ): self .client = pymongo.MongoClient() self .collection = self .client["aqy" ]["item" ] self .url_queue = Queue() self .response_queue = Queue() self .clear_queue = Queue() def get_url_queue (self ): print ("get_url_queue" ) for page in range (1 , self .TOTAL_PAGES): self .url_queue.put(self .aim_url.format (page)) def get_response_queue (self ): print ("get_response_queue" ) while True : one_url = self .url_queue.get() res = requests.get(one_url).json()['data' ]['list' ] self .response_queue.put(res) self .url_queue.task_done() def get_clear_queue (self ): print ("get_clear_queue" ) while True : one_response = self .response_queue.get() for movie in one_response: data = {} data['name' ] = movie['name' ] data['playUrl' ] = movie['playUrl' ] data['description' ] = movie['description' ] self .clear_queue.put(data) self .response_queue.task_done() def save_method (self ): print ("save_method" ) while True : data = self .clear_queue.get() print (data) self .collection.insert_one(data) self .clear_queue.task_done() def launch (self ): thread_list = [] thread_list.append(threading.Thread(target=self .get_url_queue, name="①执行获取所有url方法的线程" )) for i in range (10 ): thread_list.append(threading.Thread(target=self .get_response_queue, name=f"②第{i} 个用于发送请求的线程" )) thread_list.append(threading.Thread(target=self .get_clear_queue, name="③用于执行clear方法的线程" )) for i in range (3 ): thread_list.append(threading.Thread(target=self .save_method, name=f"④第{i} 个执行存储方法的线程" )) for thread in thread_list: thread.setDaemon(True ) thread.start() for queue in [self .url_queue, self .response_queue, self .clear_queue]: queue.join() if __name__ == '__main__' : start = time.time() aqy = AQY() aqy.launch() print ("持续时间:{}" .format (time.time() - start))
第二章 使用线程池 第一节 回顾多线程 1 2 3 4 5 6 7 8 9 10 11 12 13 14 15 from concurrent.futures import ThreadPoolExecutordef get_url (url ): print (url) return "返回值:" + url if __name__ == '__main__' : base_url = 'https://jobs.51job.com/pachongkaifa/p{}/' with ThreadPoolExecutor(max_workers=5 ) as pool: for page in range (1 , 15 ): future = pool.submit(get_url, url=base_url.format (page)) print (future.result())
第二节 作业 需求: 使用线程池爬取 腾讯招聘 的信息
ins 1 2 3 4 5 6 7 8 9 10 11 12 13 14 15 16 17 18 19 20 21 22 23 24 25 26 27 28 29 30 31 32 33 34 35 36 37 38 39 40 41 42 43 44 45 46 47 48 49 50 51 52 53 54 55 56 57 58 59 60 61 62 63 64 65 66 67 68 69 70 71 72 73 74 75 76 77 78 79 80 81 82 83 84 85 86 87 88 89 90 91 92 import requestsimport pymysqlimport timefrom concurrent.futures import ThreadPoolExecutorclass AlibabaWork : aim_url = "https://careers.tencent.com/tencentcareer/api/post/Query?timestamp=1736664299813&countryId=&cityId=&bgIds=&productId=&categoryId=&parentCategoryId=&attrId=&keyword=python&pageIndex={}&pageSize=10&language=zh-cn&area=cn" headers = { 'User-Agent' : 'Mozilla/5.0 (Windows NT 10.0; Win64; x64) AppleWebKit/537.36 (KHTML, like Gecko) Chrome/131.0.0.0 Safari/537.36' } def __init__ (self ): self .db = pymysql.connect(host="localhost" , user="root" , password="root" , database="py_spider" ) self .cursor = self .db.cursor() @classmethod def get_information (cls, page ): res = requests.get(cls.aim_url.format (page), headers=cls.headers).json() return res['Data' ]["Posts" ] def parse_data (self, works ): for work in works: recruit_post_name = work['RecruitPostName' ] responsibility = work['Responsibility' ] post_url = work['PostURL' ] self .save_data(recruit_post_name, responsibility, post_url) def save_data (self, *params ): """传参按照如下顺序 RecruitPostName, Responsibility, PostURL""" sql = "insert into tx_work(recruit_post_name,responsibility,post_url) values(%s, %s, %s)" try : self .cursor.execute(sql, params) self .db.commit() print ("插入成功!" ) except Exception as e: self .db.rollback() print ("==>插入失败" , e) def create_table (self ): sql_create_table = """ create table if not exists tx_work( id int auto_increment primary key not null, recruit_post_name varchar(500), responsibility text, post_url varchar(500) ) charset=utf8 engine=innodb; """ try : self .cursor.execute(sql_create_table) print ("表创建成功" ) except Exception as e: print ("==>表创建失败" , e) def launch (self ): self .create_table() with ThreadPoolExecutor(max_workers=5 ) as thread: futures = [thread.submit(self .get_information, page=page) for page in range (1 , 30 )] for future in futures: data = future.result() self .parse_data(data) self .db.close() def single (self ): self .create_table() for page in range (1 , 30 ): print (f"当前爬取第{page} 页的数据" ) res = self .get_information(page) self .parse_data(res) if __name__ == '__main__' : start = time.time() alibaba_work = AlibabaWork() alibaba_work.single() print ("持续时间: " , time.time() - start)
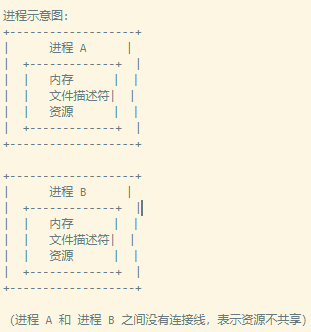
第三章 使用多进程 第一节 对比进程和线程 线程中资源是共享的, 而进程资源不共享
$ 原因: 进程是操作系统分配资源的基本单位,每个进程都有自己的地址空间、内存、文件描述符等资源。线程是进程中的一个执行单元,多个线程可以共享同一个进程的资源,包括内存、文件描述符等。 第二节 作业 需求: 爬取 爱奇艺影视信息
3.2.1 大致思路 和线程的代码可以说是完全一致, 思路也和那个一模一样, 但因为进程(一个进程可以有很多线程)的特性, 所以会有以下问题
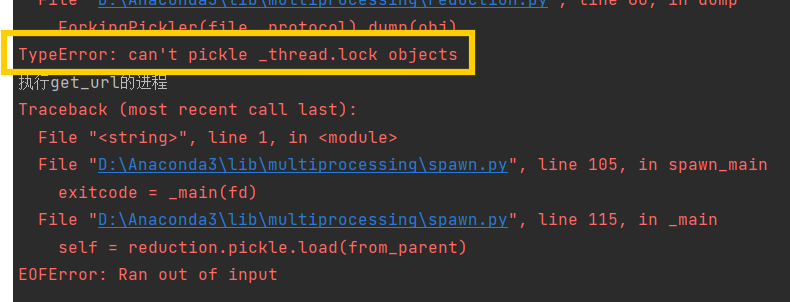
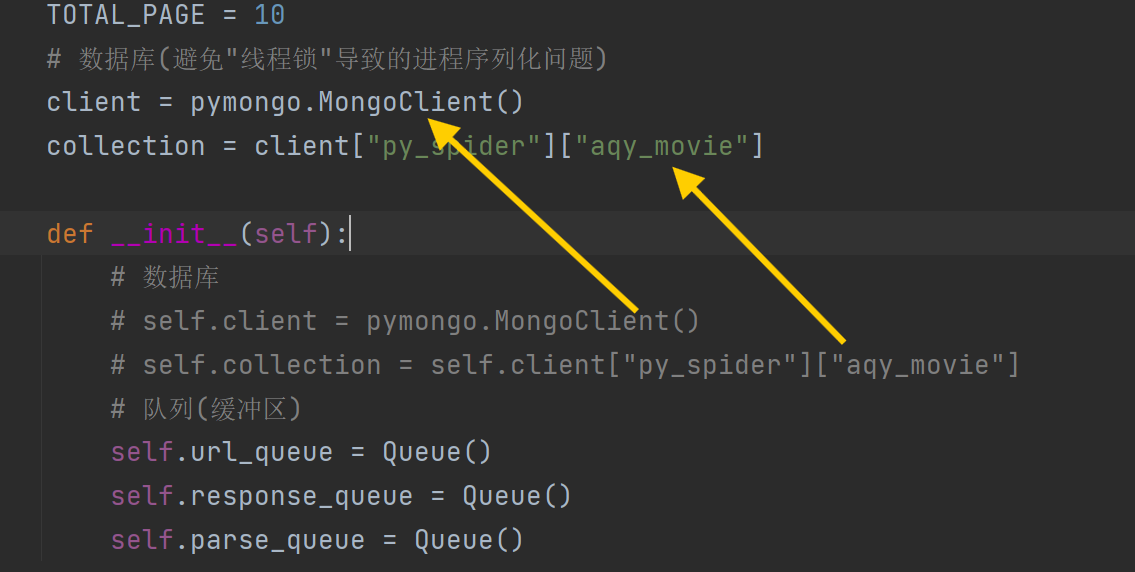
3.2.2 出现的问题 线程无法序列化(pickle): 序列化指的是将源代码==>字节文件的过程;什么时候回导致无法序列化? 有锁的时候, 如果这里就是存在线程锁,! 为什么进程需要序列号, 线程不用? 进程是最小基本单位, 每个进程都有自己的空间, 而线程只是存于内存中的, 新增线程是无需问系统要内存的(问当前进程即可), 但开辟进程需要, 代码遇到Process时会将target指定的方法拷贝一份到新的进程中(因为你要在新的进程中执行这个方法), 而如何拷贝, ==>转为二进制, 也就是序列化; 如何解决这一问题? ①将有”线程锁”的这个对象, 作为主线程的东西, 主线程无需新开辟, 所以也就无需序列号; ②什么是主线程的东西? 就是类对象 直接就结束了, 并没有爬取数据①这个是因为 进程的初始化 比 线程慢(毕竟要去开空间啥的) ②所以线程还没初始化完成, 下面的join()如果任务计数为0, 就直接退出了, 而线程都没开始工作, 那任务计数肯定为0, 所以就直接退出了 解决方法? ①方法一在判断阻塞前先睡一觉,等进程开始了再判断(不知道睡多久) ②方法二, 先运行第一个生产者,让缓冲区有东西(有点消耗速度) 3.2.3 完整代码 1 2 3 4 5 6 7 8 9 10 11 12 13 14 15 16 17 18 19 20 21 22 23 24 25 26 27 28 29 30 31 32 33 34 35 36 37 38 39 40 41 42 43 44 45 46 47 48 49 50 51 52 53 54 55 56 57 58 59 60 61 62 63 64 65 66 67 68 69 70 71 72 73 74 75 76 77 78 79 80 81 82 83 84 85 86 87 88 89 90 91 92 93 94 95 96 97 98 99 100 101 102 103 104 105 106 107 108 import requestsimport pymongoimport timefrom multiprocessing import JoinableQueue as Queue, Processclass AQYMovie : aim_url = "https://pcw-api.iqiyi.com/search/recommend/list?channel_id=1&data_type=1&mode=24&" \ "page_id={}&ret_num=48&session=6edd98b29ba0a0950a4d3556849e8506" headers = { 'user-agent' : 'Mozilla/5.0 (Windows NT 10.0; Win64; x64) AppleWebKit/537.36 (KHTML, like Gecko) Chrome/131.0.0.0 Safari/537.36' } TOTAL_PAGE = 9 client = pymongo.MongoClient() collection = client["py_spider" ]["aqy_movie" ] def __init__ (self ): self .url_queue = Queue() self .response_queue = Queue() self .parse_queue = Queue() def get_url (self ): for page in range (1 , self .TOTAL_PAGE): url = self .aim_url.format (page) self .url_queue.put(url) def get_response (self ): while True : url = self .url_queue.get() res = requests.get(url).json()['data' ]['list' ] self .response_queue.put(res) self .url_queue.task_done() def get_parse (self ): while True : response = self .response_queue.get() for res in response: data = {} data['name' ] = res['name' ] data['playUrl' ] = res['playUrl' ] data['description' ] = res['description' ] self .parse_queue.put(data) self .response_queue.task_done() def save_data (self ): while True : data = self .parse_queue.get() print (data) self .collection.insert_one(data) self .parse_queue.task_done() def run_get_url (self ): self .get_url() def launch (self ): process_list = [] self .get_url() for i in range (3 ): process_list.append(Process(target=self .get_response, name="执行get_response的进程{}" .format (i))) process_list.append(Process(target=self .get_parse, name="执行get_parse的进程" )) process_list.append(Process(target=self .save_data, name="执行save_data的进程" )) for process in process_list: process.daemon = True print (process.name) process.start() for queue in [self .url_queue, self .response_queue, self .parse_queue]: queue.join() if __name__ == '__main__' : start = time.time() aqy_movie = AQYMovie() aqy_movie.launch() print ("done! " , time.time() - start)
第四章 使用协程 第一节 基础知识 [[2.需要用到的python基础知识#十. 协程 asyncio]]
第二节 作业 需求: 爬取“王者荣耀” 里所有英雄的皮肤
$ await 后面只能加①Future对象 ②Task对象 ③coroutine 协程对象 $ async 里a) 单个等待请求等待的就用await 单个请求(注意是紧贴着await关键字是==紧贴 ==) b) 多个请求 ①: 创建任务list ②执行方法并获取协程对象(a)) ③将协程对象转为task对象task对象 = asyncio.create_task(线程对象) ④将task对象添加到任务list ⑤await asyncio.wait(task_list) c) 注意如果方法标注了async, 那里面只能是调用await, 不能调用单独的方法, 必须是支持协程的==>推出两个结论 ①只能用aiohttp不能用request ==②里面只要调用方法, 就98% 是a)情况就是使用await关键字 == $ 如何启动: asyncio.run(skin.get_hero_information()) ==wait方法启动”任务列表” ==; ==run方法启动 async方法== ! 注意:执行多个请求(task_list)哪里不需要”await” ins 1 2 3 4 5 6 7 8 9 10 11 12 13 14 15 16 17 18 19 20 21 22 23 24 25 26 27 28 29 30 31 32 33 34 35 36 37 38 39 40 41 42 43 44 45 46 47 48 49 50 51 52 53 54 55 56 57 58 59 60 61 62 63 64 65 66 67 68 """ 皮肤链接=英雄ID+皮肤ID https://game.gtimg.cn/images/yxzj/img201606/skin/hero-info/558/558-bigskin-1.jpg 所有英雄链接的json文件 """ import asyncioimport requestsimport osimport timeimport aiohttpclass WzGameSkin : skin_url = "https://game.gtimg.cn/images/yxzj/img201606/skin/hero-info/{}/{}-bigskin-{}.jpg" hero_url = "https://pvp.qq.com/web201605/js/herolist.json" headers = { 'User-Agent' : 'Mozilla/5.0 (Windows NT 10.0; Win64; x64) AppleWebKit/537.36 (KHTML, like Gecko) Chrome/131.0.0.0 Safari/537.36' } total_image = 0 async def get_hero_information (self ): async with aiohttp.ClientSession() as client: res = await client.get(self .hero_url, headers=self .headers) json_data = await res.json(content_type=None ) task_list = list () for one_hero in json_data: hero_name = one_hero['cname' ] hero_id = one_hero['ename' ] skins = {skin_id + 1 : skin_name for skin_id, skin_name in enumerate (one_hero['skin_name' ].split("|" ))} coroutine_obj = self .get_hero_skin(client, hero_name, hero_id, skins) task = asyncio.create_task(coroutine_obj) task_list.append(task) await asyncio.wait(task_list) async def get_hero_skin (self, client, hero_name, hero_id, skins ): """下载该英雄的所有皮肤""" if not os.path.exists("./skin_image" ): os.makedirs("./skin_image" ) for skin_id in skins.keys(): with open (f"./skin_image/{hero_name} -{skins[skin_id]} .png" , 'wb' ) as f: res = await client.get(self .skin_url.format (hero_id, hero_id, skin_id), headers=self .headers) image = await res.read() print (f"{res.status} : {hero_name} -{skins[skin_id]} .png 下载中...." ) f.write(image) self .total_image += 1 if __name__ == '__main__' : start = time.time() skin = WzGameSkin() asyncio.run(skin.get_hero_information()) print (f"执行时间{time.time() - start} ,皮肤数量:{skin.total_image} " )
第三节 对比requests和aiohttp 1 2 3 4 5 6 7 8 9 10 11 12 13 14 15 16 17 18 19 20 21 22 23 import requestsimport aiohttpimport asyncioaim_url = "https://www.baidu.com" def request_method (): res = requests.get(aim_url) print (res, type (res)) async def aiohttp_method (): async with aiohttp.ClientSession() as client: res = await client.get(aim_url) print (res, type (res)) if __name__ == '__main__' : print ("----------requests----------" ) request_method() print ("----------aiohttp----------" ) asyncio.run(aiohttp_method())
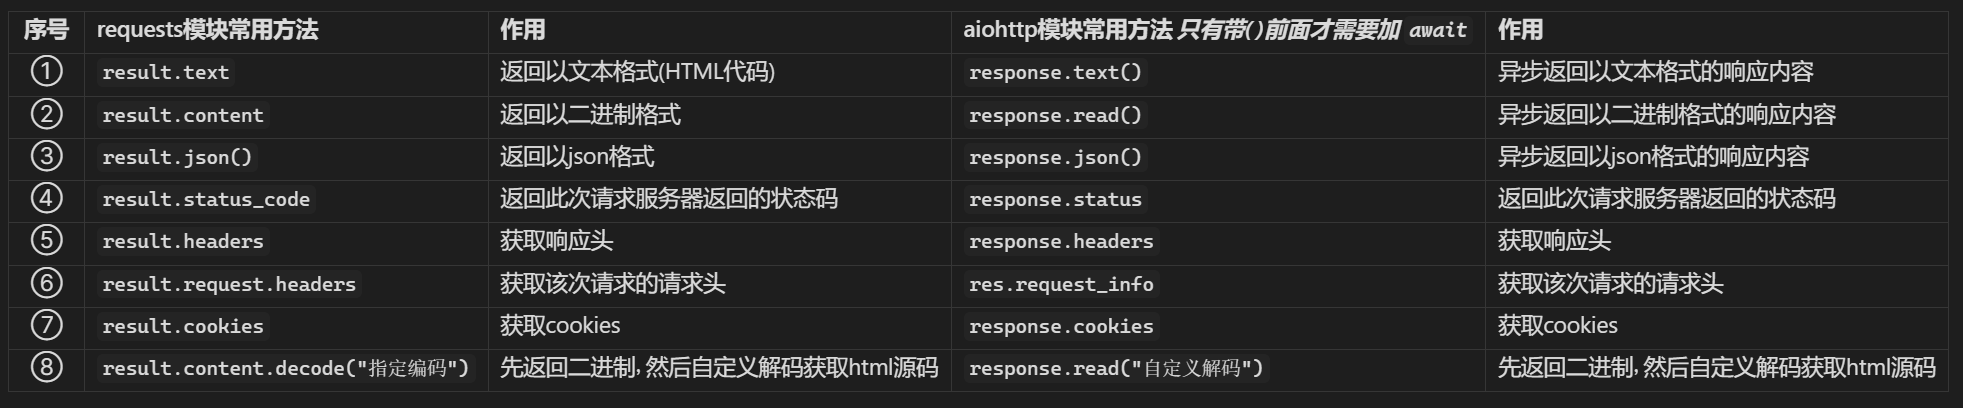
序号 requests模块常用方法 作用 aiohttp模块常用方法 只有带( )前面才需要加 await 作用 ① result.text返回以文本格式(HTML代码) response.text()异步返回以文本格式的响应内容 ② result.content返回以二进制格式 response.read()异步返回以二进制格式的响应内容 ③ result.json()返回以json格式 response.json()异步返回以json格式的响应内容 ④ result.status_code返回此次请求服务器返回的状态码 response.status返回此次请求服务器返回的状态码 ⑤ result.headers获取响应头 response.headers获取响应头 ⑥ result.request.headers获取该次请求的请求头 res.request_info获取该次请求的请求头 ⑦ result.cookies获取cookies response.cookies获取cookies ⑧ result.content.decode("指定编码")先返回二进制, 然后自定义解码获取html源码 response.read("自定义解码")先返回二进制, 然后自定义解码获取html源码
4.3.1 携带请求 1 2 3 4 5 6 7 8 9 import requestsproxies = { "http" : "http://user:password@proxyserver:port" , "https" : "http://user:password@proxyserver:port" , } response = requests.get("http://example.com" , proxies=proxies) print (response.text)
aiohttp包$ 语法: proxy=字符串 ! 注意: 一个请求只能指定一个代理!!! 1 2 3 4 5 6 7 8 9 10 11 12 13 import aiohttpimport asyncioasync def fetch (url ): async with aiohttp.ClientSession() as session: async with session.get(url, proxy="http://user:password@proxyserver:port" ) as response: return await response.text() async def main (): html = await fetch("http://example.com" ) print (html) asyncio.run(main())
第四节 关于协程对象的异常处理gather() & 说明: 这个是针对①多个协程对象 ②协程对象可能报错; 如果不报错, 就直接asyncio.wait()即可 $ 语法: 前面 转协程对象为task对象啥的都一样, 只是最后的wait改为gather response = asyncio.gather(*tasks, return_exceptions=True)返回值: ①done, pending = wait(); 两个都是<Task>对象 ==②gather的返回值是没有异常, 返回这个协程对象的返回值, 否者返回异常对象 配置了return_exceptions=True== gather()的配置: 配置return_exceptions=True: 会将这些异常作为结果返回,而不是直接抛出, 默认为False直接抛出 第五章 协程和retry 普通的retry: @retrying.retry(stop_max_attempt_number=10) 协程中支持的retry$ 语法:包:from tenacity import retry, stop_after_attempt, retry_if_exception_type 语法: @retry(stop=stop_after_attempt(10)) 位置: 放在async标注的方法上面 1 2 3 4 5 6 7 8 9 10 11 12 13 14 15 16 17 18 19 20 21 22 23 24 25 26 27 28 import asyncioimport aiohttpimport retryingfrom tenacity import retry, stop_after_attempt, retry_if_exception_typecount = 0 @retry(stop=stop_after_attempt(10 ) async def fetch (client, url ): global count count += 1 return await client.get(url, proxy="http://2.2.2.2:8890" , timeout =1 ) async def launch (): async with aiohttp.ClientSession() as client: try : coroutine_obj = await fetch(client, "https://www.baidu.com" ) except : print (count) print (type (coroutine_obj)) if __name__ == '__main__' : asyncio.run(launch()) print (count)
第五章 aiomysql 第一节 单个连接对象和游标 和pymysql一模一样, 只是改为了协程 [[7.数据存储#第四章 Python和Mysql]]
STEP1: 建立连接 STEP2: 获取游标对象 STEP3:使用游标对象 STEP4:关闭连接: ! 这里注意, db的关闭不能用协程, 因为有可能其他方法正在调用, 如果也使用await中, 就会导致其他协程任务还在执行就, 意外断了. ! 总结下协程: 在一个方法中是一定顺序执行的, 但是涉及多个方法, 就不一定是顺序的了(说的是加入”任务列表”的协程) 1 2 3 4 5 6 7 8 9 10 11 12 13 14 15 16 17 18 19 20 21 22 23 24 25 26 27 28 29 import asyncioimport aiomysqlasync def connect_mysql (): db = await aiomysql.connect(user="root" , password="root" , db="py_spider" ) cursor = await db.cursor() await cursor.execute("select * from students" ) res = await cursor.fetchall() print (res) await cursor.close() db.close() if __name__ == '__main__' : asyncio.run(connect_mysql())
第二节 多个连接对象和游标 $ 大致说明: 只有获取connnect和cursor的方式和普通的不同了①获取mysql连接池 aiomysql.create_pool() ②获取多个connect pool.acquire() ③获取多个cursor connects.cursor() 1 2 3 4 5 6 7 8 9 10 11 12 13 async def many_mysql (): pool = await aiomysql.create_pool(user="root" , password="root" , db="py_spider" ) async with pool.acquire() as connects: async with connects.cursor() as cursors: await cursors.execute("select * from tx_work" ) res = await cursors.fetchall() print (res)
第三节 作业 需求: 爬取 汽车之家 的车辆数据