第一章 环境配置 第一节 安装selenium包 1 pip install selenium==4 .9 .1
第二节 下载浏览器(Chrome)驱动 不是所有的浏览器都需要驱动才能, 用selenium去操作, 有些比如IE可以直接操作, 这里我们就用最好用,也最常用的Chrome浏览器来演示
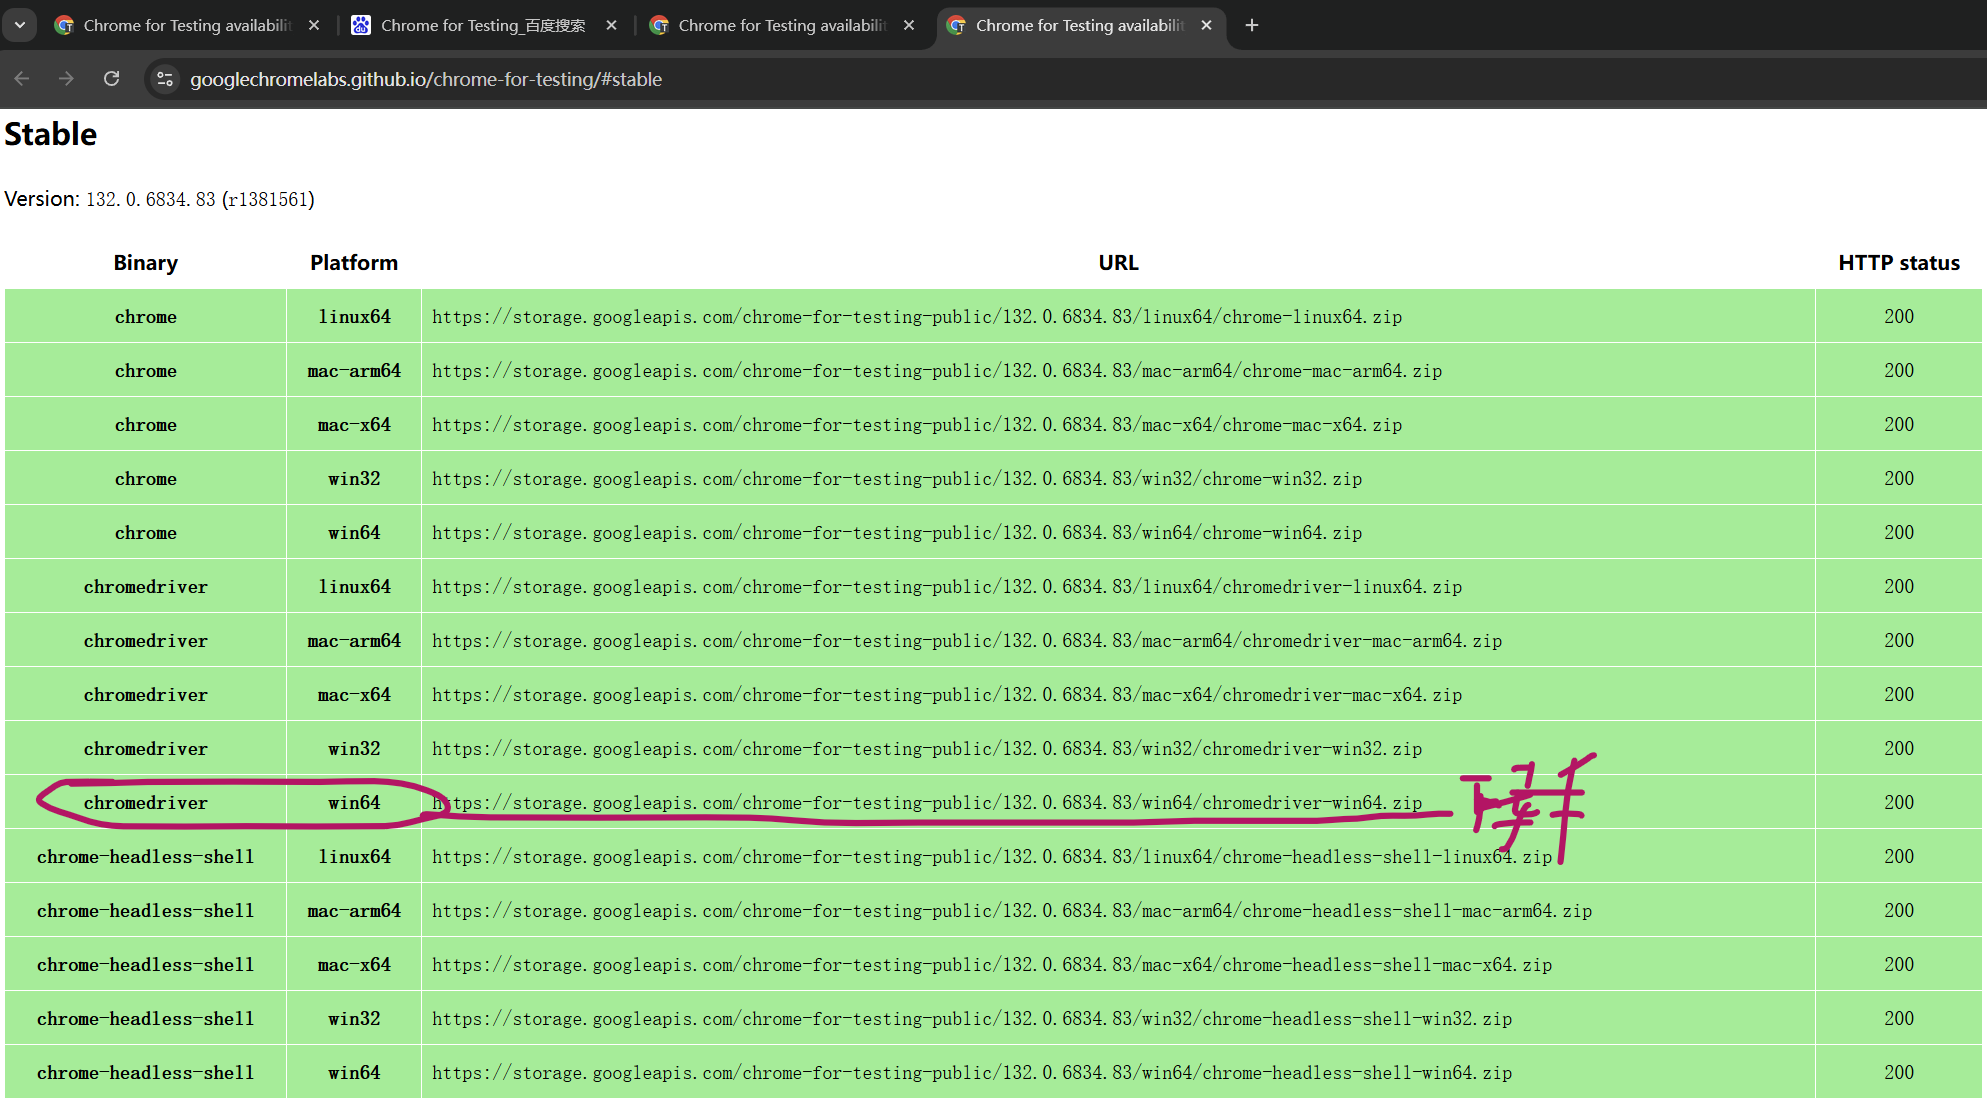
STEP1: 先把浏览器更新到最新 STEP2: 下载浏览器驱动 网址 选Stable=>chromedriver win64
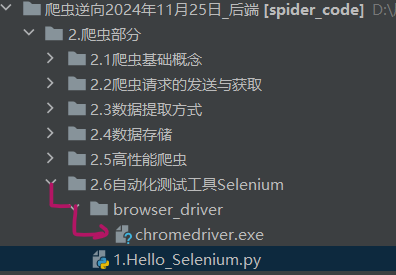
STEP3: 解压=>把exe文件拖到要使用的代码目录
第二章 Selenium基本使用 第一节 Hello Selenium $ 引导: 先说下 Selenium这个包干什么的, 方便你去理解编程; 这包是我们爬虫的”杀手锏”, 当我们的requests包实在爬不了的时候, 我们可以直接通过selenium去操作浏览器, 操作你Chrome, IE, Firefox…….所以, selenium就是用python代码操作浏览器的 STEP1: 获取service对象 STEP2: 获取浏览器对象 STEP3: 访问 指定网址 Chrome:打开就关,python程序结束,Chrome自己就关; 解决方法:sleep() or 用 Firefox
STEP4: Sleep+ 手动关闭浏览器 1 2 3 4 5 6 7 8 9 10 11 12 13 14 15 16 17 18 19 import timefrom selenium import webdriverfrom selenium.webdriver.chrome.service import Serviceservice = Service(executable_path="./browser_driver/chromedriver.exe" ) browser = webdriver.Chrome(service=service) aim_url = "https://www.baidu.com" browser.get(aim_url) time.sleep(30 ) browser.quit()
第二节 browser对象常用方法 序号 方法 描述 示例代码 ① get() 模拟访问目标网址 browser.get(“https://www.baidu.com “) ② page_source 获取网页源代码(HTML) code = `browser.page_source ③ get_cookies() 获取当前页面的cookie cookie = browser.get_cookies() ④ get_screenshot_as_file() 截取当前页面的屏幕截图,保存为文件 browser.get_screenshot_as_file(“123.png”) ⑤ current_url 获取当前请求的页面网址 current_url = browser.current_url ⑥ add_cookie(dict类型) 添加cookie 只能逐个去添加
1 2 3 4 5 6 7 8 9 10 11 12 13 14 15 16 17 18 19 20 21 22 23 24 25 26 27 28 29 30 31 32 33 34 35 36 37 38 39 40 41 42 from selenium import webdriverfrom selenium.webdriver.chrome.service import Serviceservice = Service(executable_path="./browser_driver/chromedriver.exe" ) browser = webdriver.Chrome(service=service) browser.get("https://www.baidu.com" ) """browser常用方法""" code = browser.page_source.encode("utf-8" ) cookie = browser.get_cookies() browser.get_screenshot_as_file("123.png" ) current_url = browser.current_url cookie_dict = { "VipRUID" : "617454137" , "VipRNAME" : "19037916824" , } for name, value in cookie_dict.items(): browser.add_cookie({"name" : name, "value" : value})
第三节 使用代理IP❗❗❗ 1 2 3 4 5 6 7 8 9 10 11 12 13 14 15 16 17 18 19 20 21 22 23 24 25 26 27 28 29 30 31 32 33 34 35 36 37 38 39 40 41 42 43 44 45 46 47 48 49 50 51 52 53 54 55 56 57 58 59 60 61 62 63 64 65 66 67 68 69 70 71 72 73 74 75 76 """ * 解决方法: https://blog.csdn.net/qq_35578171/article/details/135346389 * 插件GitHUb: https://github.com/RobinDev/Selenium-Chrome-HTTP-Private-Proxy """ import requestsfrom selenium import webdriverfrom selenium.webdriver.chrome.service import ServiceAPI_URL = "https://dps.kdlapi.com/api/getdps/?secret_id=o5b3w54kddfiskjsu5ta&signature=tr45ga5grnvp1943h0paert5qwquy7cb&num=1&pt=1&sep=1" USERNAME = "d4472377283" PASSWORD = "rudm2ozb" BROWSER_EXTENSION_PATH = r"D:\ins\browser_driver\chromedriver.exe" EXTENSION_PATH = r"D:\ins\Selenium-Chrome-HTTP-Private-Proxy-master" def get_proxy_details (): response = requests.get(API_URL) proxy_ip = response.text.strip() host, port = proxy_ip.split(":" ) return host, port def create_background_js (host, port ): content = f""" var config = {{ mode: "fixed_servers", rules: {{ singleProxy: {{ scheme: "http", host: "{host} ", port: parseInt({port} ) }}, bypassList: ["localhost"] }} }}; chrome.proxy.settings.set({{value: config, scope: "regular"}}, function() {{}}); function callbackFn(details) {{ return {{ authCredentials: {{ username: "{USERNAME} ", password: "{PASSWORD} " }} }}; }} chrome.webRequest.onAuthRequired.addListener( callbackFn, {{urls: ["<all_urls>"]}}, ['blocking'] ); """ with open (fr"{EXTENSION_PATH} \background.js" , "w" ) as file: file.write(content) def launch_browser (): proxy_ip_host, proxy_ip_port = get_proxy_details() create_background_js(proxy_ip_host, proxy_ip_port) service = Service(executable_path=BROWSER_EXTENSION_PATH) chrome_options = webdriver.ChromeOptions() chrome_options.add_argument("--headless=new" ) chrome_options.add_argument(f'--load-extension={EXTENSION_PATH} ' ) browser = webdriver.Chrome(service=service, options=chrome_options) browser.get('http://httpbin.org/ip' ) print (browser.page_source) browser.quit() if __name__ == '__main__' : launch_browser()
第四节 作业 需求: 使用python在百度 的①搜索框中输入内容 ②点击”百度一下”
1 2 3 4 5 6 7 8 9 10 11 12 13 14 15 16 17 18 19 20 21 22 23 24 25 26 27 28 29 30 31 32 33 34 35 import timefrom selenium import webdriverfrom selenium.webdriver.chrome.service import Servicefrom selenium.webdriver.common.by import By service = Service(executable_path="./browser_driver/chromedriver.exe" ) browser = webdriver.Chrome(service=service) "整体流程: ①打开百度==>②获取搜索框元素+向搜索框中填充元素==>③获取'百度一下'按钮元素+模拟点击" aim_url = "https://www.baidu.com" browser.get(aim_url) search_element = browser.find_element(By.CSS_SELECTOR, "#kw" ) search_element.send_keys("python" ) button = browser.find_element(By.ID, "su" ) button.click() time.sleep(10 ) browser.close()
第三章 参数配置 第一节 常见配置参数一览 $ 语法: 通过webdriver.ChromeOptions()获取'selenium.webdriver.chrome.options.Options对象 序号 参数配置 用途 示例 ==1== prefs静止加载图片 prefs = {"profile.managed_default_content_settings.images": 2}2 add_argument('-headless')无头模式(不显示浏览器界面) options.add_argument('-headless')3 add_argument('user-agent')设置请求头 options.add_argument('user-agent=这是请求头的内容')4 useAutomationExtension去除”开发者警告” options.add_experimental_option('useAutomationExtension', False)5 excludeSwitches去除”开发者警告” options.add_experimental_option('excludeSwitches', ['enable-automation'])==6== add_argument('--proxy-server')设置代理访问 options.add_argument('--proxy-server=http://58.30.184:9091')
1 2 3 4 5 6 7 8 9 10 11 12 13 14 15 16 17 18 19 20 21 22 23 24 25 26 27 28 29 30 31 32 33 34 35 36 37 38 39 40 41 42 43 44 45 import timefrom selenium import webdriverfrom selenium.webdriver.chrome.service import Serviceservice = Service(executable_path="./browser_driver/chromedriver.exe" ) options = webdriver.ChromeOptions() prefs = {"profile.managed_default_content_settings.images" : 2 } options.add_experimental_option("prefs" , prefs) options.add_experimental_option('useAutomationExtension' , False ) options.add_experimental_option('excludeSwitches' , ['enable-automation' ]) browser = webdriver.Chrome(service=service, options=options) browser.get("https://www.baidu.com" ) time.sleep(50 ) browser.quit()
第四章 页面元素获取 第一节 获取单个页面元素 $ 语法: By包+browser.find_element() 1 2 3 4 5 6 from selenium.webdriver.common.by import Bybrowser.find_element(By.ID, 'wp' ) browser.find_element(By.CSS_SELECTOR, '#wp' ) browser.find_element(By.XPATH, r'\\ul[@class="ul_style"]\\li' )
第二节 获取多个页面元素 $ 语法: By包+browser.find_elements() 需求: 获取 长沙晚报网 所有的<li>标签的
1 2 3 4 5 6 7 8 9 10 11 12 13 14 15 16 17 18 19 20 21 22 23 24 25 26 27 28 29 30 31 from selenium import webdriverfrom selenium.webdriver.chrome.service import Servicefrom selenium.webdriver.common.by import Byservice = Service(executable_path="./browser_driver/chromedriver.exe" ) browser = webdriver.Chrome(service=service) aim_url = "https://www.icswb.com/channel-list-channel-161.html" browser.get(aim_url) li_list = browser.find_elements(By.CSS_SELECTOR, "#NewsListContainer li" ) [print (i) for i in li_list] """ 题外话:这里主要是想展示elements的用法,真想获取页面元素的文本内容的话 selenium做不到! selenium做不到! selenium做不到! selenium做不到! selenium做不到! selenium做不到! selenium做不到! selenium做不到! selenium做不到! (做的不是很好, 可以说很差劲...) 可以同获取 browser.get_source() 页面HTML原码, 解析为lxml.etree再用xpath去获取文本 """
第五章 元素属性获取 $ 语法: 元素.get_attribute("属性名")需求: 获取 长沙晚报网 所有的<li>标签的下的<a>的链接href和标题title属性
1 2 3 4 5 6 7 8 9 10 11 12 13 14 15 16 17 18 19 20 21 22 23 24 25 26 import timefrom selenium import webdriverfrom selenium.webdriver.chrome.service import Servicefrom selenium.webdriver.common.by import Byservice = Service(executable_path="./browser_driver/chromedriver.exe" ) browser = webdriver.Chrome(service=service) browser.get("https://www.icswb.com/channel-list-channel-161.html" ) a_list = browser.find_elements(By.CSS_SELECTOR, "#NewsListContainer li a" ) for a in a_list: href = a.get_attribute('href' ) title = a.get_attribute('title' ) print (href, title)
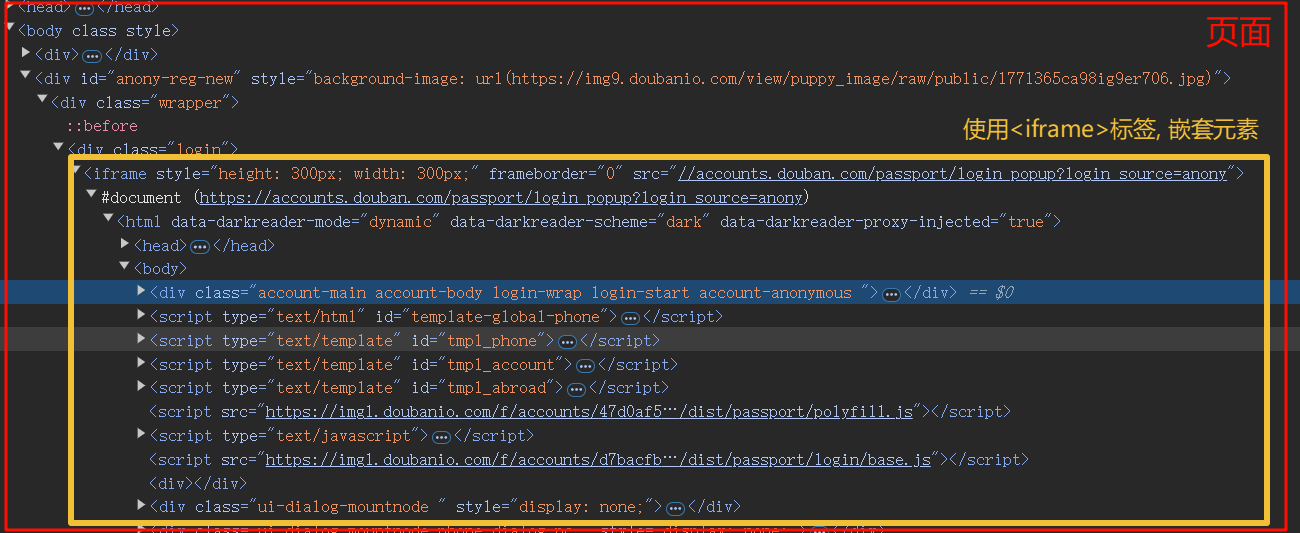
第六章 元素交互 第一节 常用的交互方法 6.1.1 填充属性值 6.1.2 清空值 6.1.3 模拟点击 6.1.4 iframe切换 $ 语法: browser.switch_to.frame("子页面元素") & 说明: 页面HTML,是会存在”嵌套关系”的(如导航栏多个页面公用, 直接嵌套) ! 注意: 嵌套是不可通过xpath的//语法直接获取到的, 必须得切换到目标iframe中才能继续使用//语法需求: 登录 豆瓣 自动输入账号信息, 和密码信息, 点击”登录”进行登录
ins 1 2 3 4 5 6 7 8 9 10 11 12 13 14 15 16 17 18 19 20 21 22 23 24 25 26 27 28 29 30 31 32 33 34 35 36 37 38 39 40 41 import timefrom selenium import webdriverfrom selenium.webdriver.chrome.service import Servicefrom selenium.webdriver.common.by import Byservice = Service(executable_path="./browser_driver/chromedriver.exe" ) browser = webdriver.Chrome(service=service) aim_url = "https://www.douban.com/" browser.get(aim_url) login_iframe = browser.find_element(By.XPATH, '//div[@class="login"]/iframe' ) """print(login_iframe.get_attribute("style")) # 一定要打印下属性确定下, 看有没有拿错""" browser.switch_to.frame(login_iframe) time.sleep(2 ) browser.find_element(By.CLASS_NAME, "account-tab-account" ).click() account_input = browser.find_element(By.ID, "username" ) password_input = browser.find_element(By.ID, "password" ) account_input.send_keys("这是用户名" ) password_input.send_keys("我是password" ) time.sleep(2 ) browser.quit()
第二节 动作链 @ 解释: 什么是动作链, 比如”拖拽元素A到元素B内”, 这就是一个动作链 (滑动验证码常用) $ 语法:包: from selenium.webdriver import ActionChains 步骤: ①创建ActionChains(browser)对象 ②编写动作链内容 ③执行动作链action.perform() 需求: 拖拽 页面 元素
ins 1 2 3 4 5 6 7 8 9 10 11 12 13 14 15 16 17 18 19 20 21 22 23 24 25 26 27 28 import timefrom selenium import webdriverfrom selenium.webdriver.chrome.service import Servicefrom selenium.webdriver.common.by import Byfrom selenium.webdriver import ActionChains service = Service(executable_path="./browser_driver/chromedriver.exe" ) browser = webdriver.Chrome(service=service) aim_url = "https://www.runoob.com/try/try.php?filename=jqueryui-api-droppable" browser.get(aim_url) targ_iframe = browser.find_element(By.XPATH, '//div[@id="iframewrapper"]/iframe' ) browser.switch_to.frame(targ_iframe) source = browser.find_element(By.ID, "draggable" ) target = browser.find_element(By.ID, "droppable" ) action = ActionChains(browser) action.drag_and_drop(source, target) action.perform() time.sleep(10 ) browser.quit()
第三节 页面滚动(如何执行js代码) $ 执行js代码的的语法: browser.execute_script("js代码") $ js滚动页面的语法:①window.scrollBy(X,Y):相对滚动:每次以当前位置为起点,向下滚动”dist*50”的距离,越滚越多 ②window.scrollTO(X,Y):绝对滚动:每次以当前位置为起点,向下滚动”dist*50”的距离,越滚越多 需求: 向下滚动这个页面页面
ins 1 2 3 4 5 6 7 8 9 10 11 12 13 14 15 16 17 18 19 20 import timefrom selenium import webdriverfrom selenium.webdriver.chrome.service import Serviceservice = Service(executable_path="./browser_driver/chromedriver.exe" ) browser = webdriver.Chrome(service=service) aim_url = "https://36kr.com/" browser.get(aim_url) for dist in range (1 , 30 ): browser.execute_script(f"window.scrollBy(0, {dist * 50 } )" ) time.sleep(0.5 ) time.sleep(20 ) browser.quit()
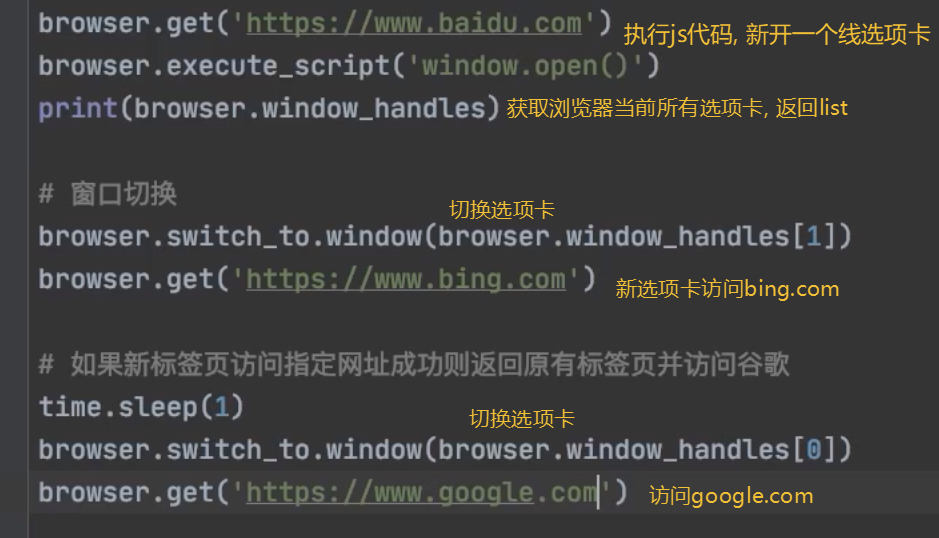
第四节 切换浏览器选项卡
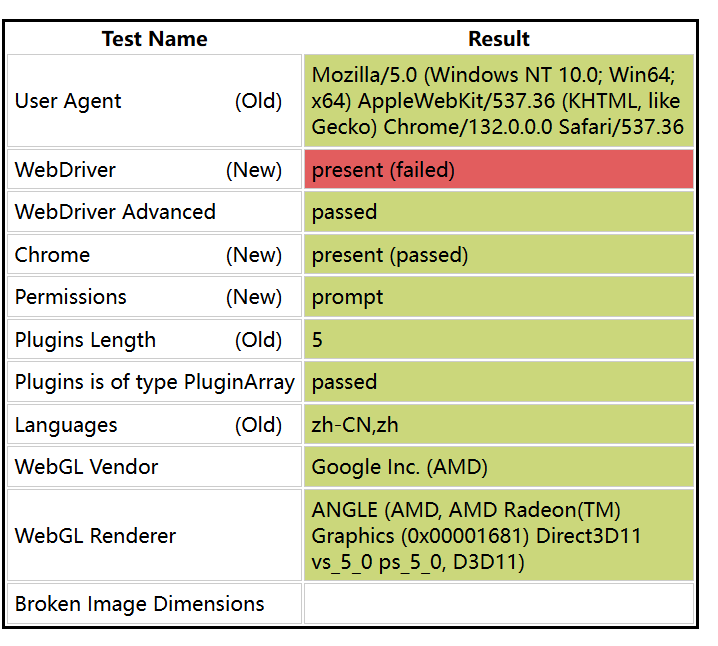
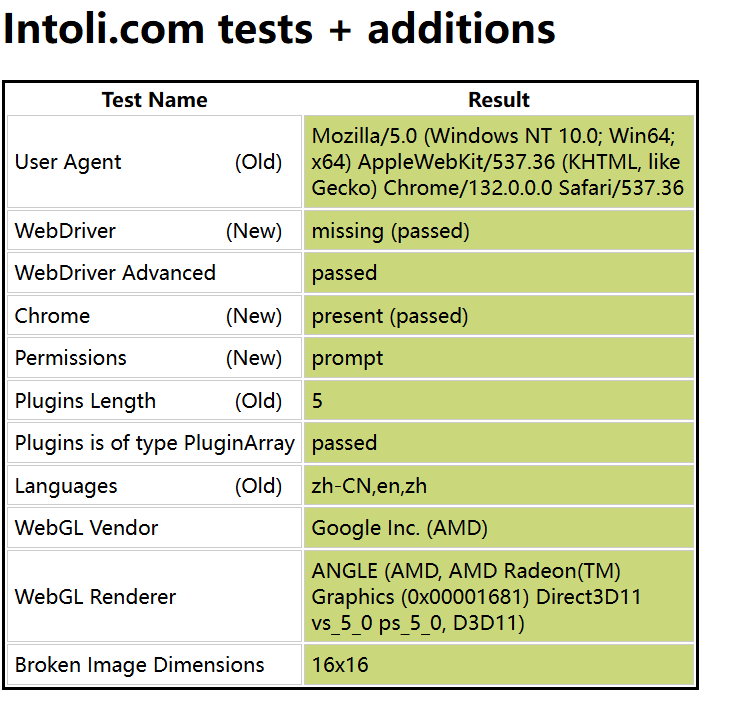
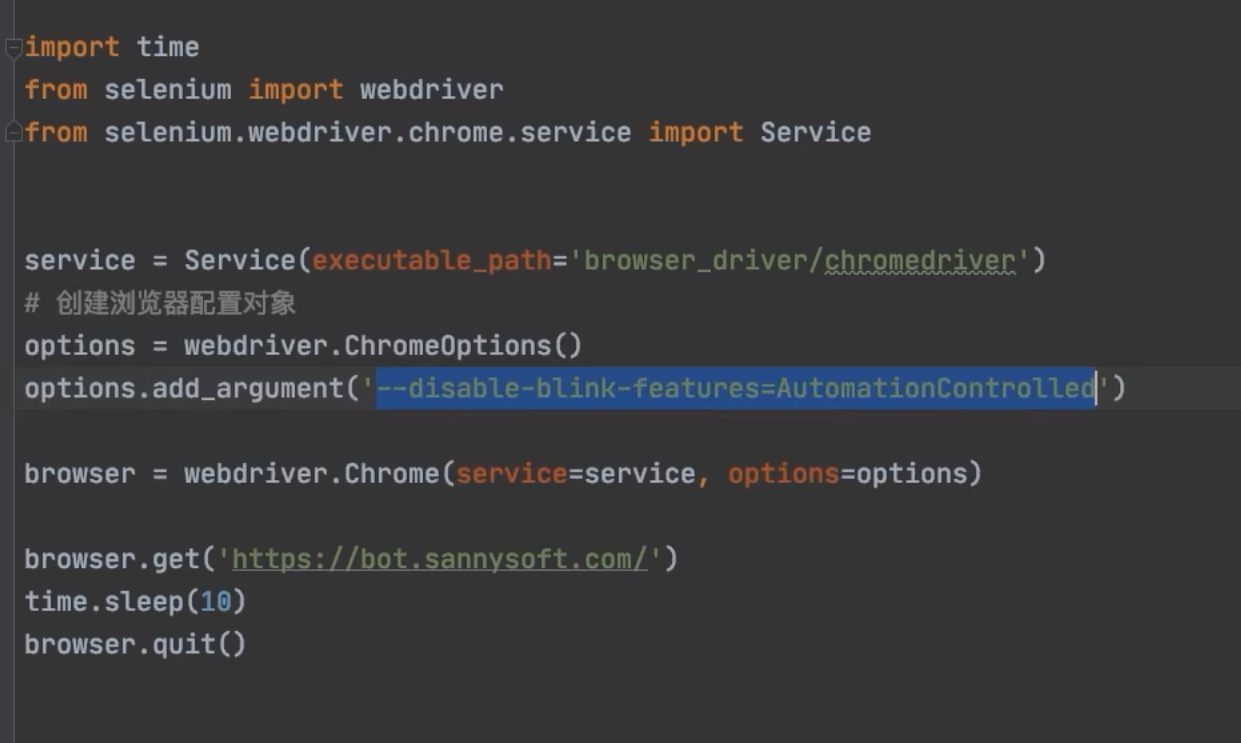
第七章 绕过检测 谷歌浏览器: 通过访问这个网站 可以判断, 当前是否通过webdriver进行访问的; 或在”控制台”: navigator.webdriver false/true
这里介绍谷歌浏览器绕过检测的方法: 配置--disable-blink-features=AutomationControlled 火狐要写插件教程 , 这里不赘述 第八章 作业(综合案例) 需求: 爬取 苏宁易购 ①搜索商品 ②抓取商品信息(商品名称, 价格, 链接)
1 2 3 4 5 6 7 8 9 10 11 12 13 14 15 16 17 18 19 20 21 22 23 24 25 26 27 28 29 30 31 32 33 34 35 36 37 38 39 40 41 42 43 44 45 46 47 48 49 50 51 52 53 54 55 56 57 58 59 60 61 62 63 64 65 66 67 68 69 70 71 72 73 74 75 76 77 78 79 80 81 82 83 84 85 86 87 88 89 from selenium import webdriverfrom selenium.webdriver.chrome.service import Servicefrom selenium.webdriver.common.by import Byimport pymongoimport timefrom random import randintfrom lxml import etreeclass SuningShop : mongo_client = pymongo.MongoClient() collection = mongo_client["py_spider" ]['suning_shop' ] service = Service(executable_path="./browser_driver/chromedriver.exe" ) options = webdriver.ChromeOptions() prefs = {"profile.managed_default_content_settings.images" : 2 } options.add_experimental_option("prefs" , prefs) options.add_experimental_option('useAutomationExtension' , False ) options.add_experimental_option('excludeSwitches' , ['enable-automation' ]) browser = webdriver.Chrome(service=service, options=options) aim_url = "https://www.suning.com/?safp=d488778a.13701.0.efacd7b69d&safpn=10007" @classmethod def input_search (cls, content ): cls.browser.get(cls.aim_url) search_input = cls.browser.find_element(By.ID, "searchKeywords" ) search_button = cls.browser.find_element(By.ID, "searchSubmit" ) time.sleep(2 ) search_input.send_keys(content) search_button.click() time.sleep(2 ) @classmethod def scroll_page (cls ): for dist in range (30 ): cls.browser.execute_script(f"window.scrollTo(0, {700 * dist} )" ) time.sleep(randint(1 , 3 )) @classmethod def get_cur_page_information (cls ): html_obj = etree.HTML(cls.browser.page_source) commodity_list = html_obj.xpath('//ul[@class="general clearfix"]/li' ) time.sleep(3 ) for commodity in commodity_list: data = dict () price = commodity.xpath('.//div[@class="price-box"]/span[@class="def-price"]/text()' ) data['price' ] = price[1 ] if len (price) >= 2 else price[0 ] url = commodity.xpath('.//div[@class="title-selling-point"]/a/@href' )[0 ] data['url' ] = "https://passport.suning.com" + url[1 :] if "http" not in url else url title = commodity.xpath('.//div[@class="title-selling-point"]/a//text()' )[0 ] data["title" ] = "" .join([t for t in title if t!="/n" ]) print (data) print ("============================" ) cls.collection.insert_one(data) @classmethod def launch (cls, content ): cls.input_search(content) time.sleep(2 ) cls.scroll_page() time.sleep(3 ) cls.get_cur_page_information() time.sleep(3000 ) print ("done!" ) cls.browser.quit() if __name__ == '__main__' : sunning_shop = SuningShop() sunning_shop.launch("电脑" )
第X章 总结 第一节 包 序号 描述 示例 ① 基础包 a) from selenium import webdriver b)from selenium.webdriver.chrome.service import Service ② 元素获取 from selenium.webdriver.common.by import By③ 动作链 from selenium.webdriver import ActionChains
第二节 Browser常用方法 序号 方法 返回值 描述 示例代码 ① get() 无 模拟访问目标网址 browser.get(“https://www.baidu.com “) ② page_source str 获取网页源代码(HTML) code = `browser.page_source ③ get_cookies() list<dict>获取当前页面的cookie cookie = browser.get_cookies() ④ get_screenshot_as_file() bool截取当前页面的屏幕截图,保存为文件 browser.get_screenshot_as_file(“123.png”) ⑤ current_url str获取当前请求的页面网址 current_url = browser.current_url add_cookie(dict) 一次只能加一个字典cookie
第三节 参数配置: 序号 参数配置 描述 示例 ==①== prefs静止加载图片 prefs = {"profile.managed_default_content_settings.images": 2}② add_argument('-headless')无头模式(不显示浏览器界面) options.add_argument('-headless')③ add_argument('user-agent')设置请求头 options.add_argument('user-agent=这是请求头的内容')④ useAutomationExtension去除”开发者警告” options.add_experimental_option('useAutomationExtension', False)⑤ excludeSwitches去除”开发者警告” options.add_experimental_option('excludeSwitches', ['enable-automation'])==⑥== add_argument('--proxy-server')设置代理访问 options.add_argument('--proxy-server=http://58.30.184:9091')
第四节 元素获取方法 By包 用途 示例 选取一个元素 browser.find_element(By.ID, 'wp')选取多个元素 li_list = browser.find_elements(By.CSS_SELECTOR, "ul li")
第五节 元素属性获取: $ 语法: 元素.get_attribute("属性名") 第六节 元素交互: ActionChains包 序号 方法 描述 ① 元素.send_keys("值") 填充属性值 ② 元素.clear() 清除内容 ③ 元素.click() 元素点击 ④ browser.switch_to.frame("子页面元素") 切换iframe ⑤ browser.execute_script("js代码") 执行JS代码 ⑥ action.drag_and_drop(source, target)动作链 序号 方法 返回值 ① browser.find_element() selenium.webdriver.remote.webelement.WebElement② browser.find_elements() list
title 1 2 3 4 5 from selenium.webdriver.common.by import Bybrowser.find_element(By.ID, 'wp' ) browser.find_element(By.CSS_SELECTOR, '#wp' ) browser.find_element(By.XPATH, r'\\ul[@class="ul_style"]\\li' )