3.Mybatis学习

第一章 学习Mybatis的切入点
有几个比较重要的部分
- 深入学习核心配置文件[mybatis-config.xml]
- 如何将**xxxMapper.xml和xxxMapper.java对应上**(函数和xml对应关系)
- 函数名称: 通过id, 并且实现不同的函数需要不同的元素
- 传入参数: Mybatis有自己的 入参规则(单个or多个参数)
- 回传参数: 同样, 有自己的 回传规则(resultType和resultMap)
- Mybatis的特殊技能
- 动态SQL
- 缓存机制
- 逆向工程
- 分页查询
注意:
- 关于属性和元素(子标签)
1 | <typeAliases> |
第二章 HelloMybatis
第一节 STEP1: pom.xml配置
1 | <!--pom.xml--> |
第二节 STEP2:核心配置文件[mybatis-config.xml]
- 配置基本数据库信息(可以写死, 也可以properties)
- 设置映射文件的路径
1 | #database.properties的内容 |
1 |
|
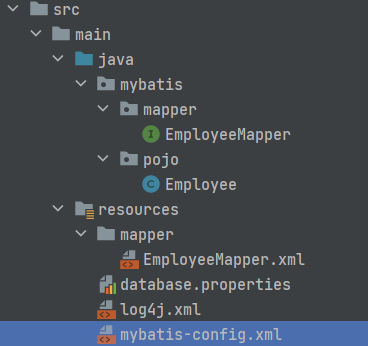
第三节 STEP3: 相关接口[xxxMapper.java]及映射文件[xxxMapper.xml]
- 接口(就是原来的DAO)
1 | package mybatis.mapper; |
- 映射文件(主要作用为Mapper接口书写Sql语句, 就是原来DAOimplement的作用)
1 |
|
相互关系
映射文件名与接口名一致
映射文件namespace与接口全类名一致
映射文件SQL的Id与接口的方法名一致
第四节 STEP4:测试
- 从 Resources中 获取 SqlSessionFactory对象
- 从SqlSessionFactory中获取SqlSession对象
- 获取映射XXXMapper代理对象
- 测试开始
1 | // 1. 从 Resources中 获取 SqlSessionFactory对象 |
第三章 深入学习核心配置文件中的元素[mybatis-config.xml]
注意这里只展示部分常用元素, 同时这些元素有指定顺序,编写时必须按照此顺序 见官网
第一节 properties
- 作用:定义或引入外部属性文件
- 属性:
- url: 填写绝对路径, 从文件中去找
- resource: 写相对与resources(Maven)的路径
- 元素:
- property: 内联式的设置K,V
- 如何引用resource中的K,V: 在需要引用的地方${键}
- 代码示例:
1 | # 通过设置properties属性, 实现外链式properties文件 |
第二节 settings
作用:这是 MyBatis 中极为重要的调整设置,它们会改变 MyBatis 的运行时行为。
属性: 🈚️
元素: 很多, 去官网查看
mapUnderscoreToCamelCase
- 取值: true | false (default:false)
- 作用: 驼峰式命名last_name=>lastName
- 注意: 开启后原名不再可用
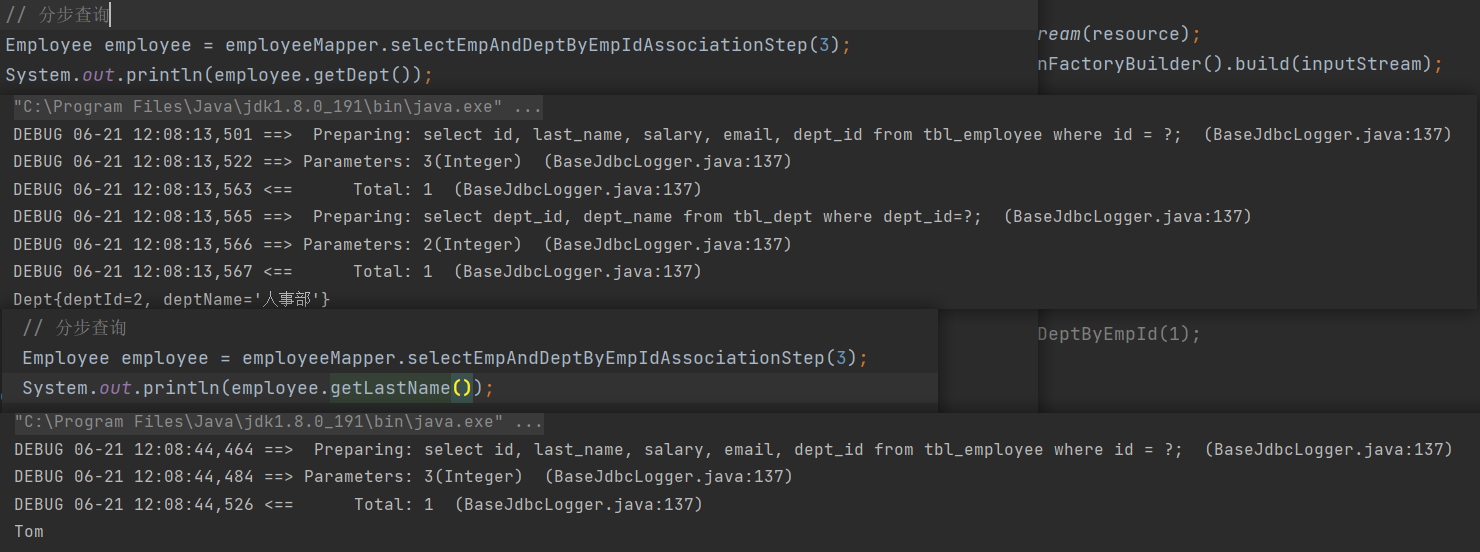
lazyLoadingEnabled
取值: true | false (default:false)
作用: 开启懒加载后, 只有用到才加载, 否则不加载; 未开启的话,无论是否用到, 都会加载
示例: 在下方的**分步查询**中可以看到效果

aggressiveLazyLoading
- 取值: true | false (default: false [在 3.4.1 及之前的版本中默认为 true])
作用: 只要这个开启上面的懒加载就不起作用
1 | <settings> |
第三节 typeAliases
- 作用:类型别名可为 Java 类型设置一个缩写名字。一般是为pojo定义别名
- 属性: 🈚️
- 元素:
- typeAlias: 为指定的类定义别名
- package: 为指定包下的所有类名自动定义别名(不区分大小写, 但单词得写对)
- 代码示例
1 | <typeAliases> |
第四节 environments
1 | <!--设置数据库连接环境--> |
第五节 mappers
作用: 设置映射文件(xml)路径
属性: 🈚️
元素:
使用相对于类路径的资源引用(推荐)
1
2
3<mappers>
<mapper resource="org/mybatis/builder/AuthorMapper.xml"/>
</mappers>使用完全限定资源定位符(URL)
1
2
3<mappers>
<mapper url="file:///var/mappers/AuthorMapper.xml"/>
</mappers>使用映射器接口实现类的完全限定类名
1
2
3<mappers>
<mapper class="org.mybatis.builder.AuthorMapper"/>
</mappers>将包内的映射器接口全部注册为映射器
1
2
3
4<!--要求:接口的包名与映射文件的包名需要一致, 全路径完全一致, 不只是上级文件夹名字一致-->
<mappers>
<package name="org.mybatis.builder"/>
</mappers>
第四章 如何将xxxMapper.xml和xxxMapper.java对应上(函数和xml对应关系)
第一节 映射文件部分元素
4.1.1 insert, delete, update
作用: 增删改
属性:
- id: 与xxxMapper.java接口中的方法名称对应
- useGeneratedKeys: true/false; 是否启用主键生成策略
- keyProperty: 设置属性值(e.g. 比如我要pojo中Employee的id属性来获取到自增的主键值
元素:🈚️
任务:
在插入后, 得到插入的id(主键)
1
2
3
4
5
6<!--EmployeeMapper.xml-->
<!--开启自增, 同时指定主键, 后续测试时可以直接得主键值-->
<insert id="insertEmployee" keyProperty="id" useGeneratedKeys="true">
insert into tbl_employee (last_name, email, salary)
values (#{last_name}, #{email}, #{salary});
</insert>1
2
3
4
5
6// EmployeeTest.java
EmployeeMapper employeeMapper = sqlSession.getMapper(EmployeeMapper.class); //3.获取映射xxxMapper代理对象
Employee employee = new Employee(null, "Tom", "23@32", 23.3);
employeeMapper.insertEmployee(employee);
System.out.println(employee.getId()); // 加上后结果为自增的id值, 否则为null注意, 这里如果是insert/delete/update的话, 要手动提交事务
什么?你说你不用手动提交也可以?数据库创建时引擎不是innoDB
对于Mysql数据库, 只有InnoDB引擎是支持事务的其他都不支持
可以通过
SHOW TABLE STATUS FROM 'your_table_name';查看当前数据库的引擎;1
2
3
4
5
6
7
8
9
10/*调用处 test.java*/
// 2. 从SqlSessionFactory中获取SqlSession对象
SqlSession sqlSession = sqlSessionFactory.openSession();
// 3. 获取映射xxxMapper代理对象
EmployeeMapper employeeMapper = sqlSession.getMapper(EmployeeMapper.class);
Employee employee = new Employee(null, "Yohoal","[email protected]",666.6 );
employeeMapper.insertEmployee(employee);
sqlSession.commit();
4.1.2 select
4.1.3 sql
- 作用: 定义可重用的SQL语句块
4.1.4 cache:
- 作用: 设置**当前**namespace的缓存配置
4.1.5 cache-ref:
- 作用: 设置**其他**namespace的缓存配置
4.1.6 resultMap(回传规则):
- 作用: 描述如何从数据库结果集中加载对象, resultType解决不了的问题,交给resultMap
第二节 函数名称
4.2.1 xml与java文件的三对应
- ① 映射文件名与接口名一致
- ② 映射文件namespace与接口全类名一致
- ③ 映射文件SQL的Id与接口的方法名一致
第三节 入参规则
4.3.1 单个参数
- 基本类型, 可以任意命名, 但推荐见名思义
1 | /*EmployeeMapper.java*/ |
1 | <!--EmployeeMapper.xml--> |
- 集合类型: 是有可能传入集合类型的, 比如需求—-询员工id在集合employees中的所有员工信息; 但这一般用到
动态化SQL-foreach循环标签
4.3.2 多个参数–匿名参数
- param1、param2 或 arg0、arg1;
1 | /*EmployeeMapper.java*/ |
1 | <!--EmployeeMapper.xml--> |
4.3.3 多个参数–POJO参数
- 函数: 传入单个pojo变量; xml: 写pojo中的成员变量(属性)
1 | /*EmployeeMapper.java*/ |
1 | <!--EmployeeMapper.xml--> |
4.3.4 多个参数–命名参数
- 函数: @Param注解命名; xml: 写注解命的名
- @Param(value=”xml中入参的参数名”) 或 @Param(“xml中入参的参数名”)
- 注意: 命名参数的入参方法同时支持匿名参数的(param1, param2)[不支持arg, 只有命名参数, pojo不行, 下面的也不行]
1 | /*EmployeeMapper.java*/ |
1 | <!--EmployeeMapper.xml--> |
4.3.5 多个参数–Map参数
- 函数: Map; xml: 参数名为Map中的键(key)
1 | /*调用时*/ |
1 | /*EmployeeMapper.java*/ |
1 | <!--EmployeeMapper.xml--> |
4.3.6 占位符–#{}
- 底层: 【#】底层执行SQL语句的对象,使用PreparedStatementd(?),预编译SQL,防止SQL注入安全隐患,相对比较安全。
- 使用场景: #使用场景,sql占位符位置均可以使用#
4.3.7 占位符–${}
- 底层:【$】底层执行SQL语句的对象使用**Statement(字符串拼接)**对象,未解决SQL注入安全隐患,相对不安全。
- 使用场景: $使用场景,比如表名, 得字符串拼接把, 我函数想传入不同的名字, 查不同的表,;
第四节 回传规则
4.4.1 单表查询[resultType=”pojo”]
resultType: POJO对象 (单个对象或对象的集合都是只写这个对象)
示例:
1
2/*EmployeeMapper.java*/
public ArrayList<Employee> selectByMap(Map<String, Object> map);1
2
3
4
5
6
7<!--EmployeeMapper.xml-->
<select id="selectByMap" resultType="mybatis.pojo.Employee">
select id, last_name, email, salary
from tbl_employee
where salary=#{S}
and last_name=#{LName};
</select>
4.4.2 多表查询[resultMap]
①数据库中表的**连接查询** 在 java中用**对象之间的嵌套**体现:
比如数据库中的两张表 tbl_employee(id, salary, last_name, dept_id); tbl_dept(dept_id, dept_name)
在java中就是体现就是 Employee的成员变量(属性)中添加一个Dept dept即可②在回传规则中直接写resultType =”mybatis.pojo.Employee”不行:
Mybatis不能自动的去映射Employee, 所以得自定义映射规则, 用到resultMap
resultMap的属性和元素
属性:
- id: 指定这个resultMap的名称, 方便后续引用指定的resultMap
- type: 函数的返回类型(Pojo)
元素:
1
<id column="数据库中的字段名" property="Pojo中的成员变量(属性)名"> <!--主键字段与属性关联关系-->
1
<result column="数据库中的字段名" property="Pojo中的成员变量(属性)名"> <!--定义非主键字段与属性关联关系-->
1
2
3
4<association property="Pojo中的成员变量(属性)名" javaType="嵌套的Pojo全路径(开启别名可以用别名)">
<result column="dept_id" property="deptId"/> <!--嵌套的pojo中的字段, 遵循id和result元素规则-->
<result column="dept_name" property="deptName"/>
</association>1
2
3
4
5
6
7<collection property="Pojo中的成员变量(属性)名" ofType="嵌套的Pojo全路径(开启别名可以用别名)">
<id column="id" property="id"/> <!--嵌套的pojo中的字段, 遵循id和result元素规则-->
<result column="last_name" property="lastName"/>
<result column="email" property="email"/>
<result column="salary" property="salary"/>
<result column="dept_id" property="deptId"/>
</collection>
resultMap-级联映射(一对一映射关系)
比如一个员工只能属于一个部门; 那在员工中
Dept deptId这个字段, 就是一对一的映射关系
1 | /*EmployeeMapper.java*/ |
1 | <!--EmployeeMapper.xml--> |
resultMap-Association映射(一对一映射关系)
1 | /*EmployeeMapper.java*/ |
1 | <!--EmployeeMapper.xml--> |
resultMap-Collection(一对多映射关系)
一个部门可以有多个员工; 那在一个部门中加入
List<Employee> employees这个字段就是一对多关系
1 | /*Dept.java*/ |
1 | <!--DeptMapper.xml--> |
4.4.3 分步查询[resultMap]
[association/collection]中的属性(分步查询需要的)
1
2
3
4
5<association property="Pojo中的成员变量(属性)名"
select="函数的全路径名(.java那个)"
column="在嵌套的那边查询需要的成员变量"
fetchType="eager|lazy 对于当前sql语句是否启用懒加载[优先级最高,不受全局setting的设置影响]">
</association>column:
- 当另外一边只需要一个传入参数时
column="deptId" - 但当另一边需要多个参数传入时:
column="{dId=deptId, eId=empId}"
- 当另外一边只需要一个传入参数时
一对一映射association
示例: 通过员工id获取员工信息及员工所属的部门信息【分步查询】
- 先通过员工id获取员工信息【id、last_name、email、salary、dept_id】
- 再通过部门id获取部门信息【dept_id、dept_name】
1 | /*EmployeeMapper.java*/ |
1 | <!--EmployeeMapper.xml--> |
1 | /*DeptMapper.java*/ |
1 | <!--DeptMapper.xml--> |
一对多映射collection
示例: 通过dept_id获取部门信息及改部门的所有员工信息【分步查询】
- 通过deptId获取部门信息(deptId, deptName)
- 通过deptId获取员工信息(id, lastName, email, salary, deptId)
1 | /*DeptMapper.java*/ |
1 | <!--DeptMapper.xml--> |
1 | /*EmployeeMapper.java*/ |
1 | <!--EmployeeMapper.xml--> |
调用过程与顺序
4.4.4 万能[resultType=”map”]
查询单行数据返回Map集合
resultType: map(小写)
示例
1
2
3/*EmployeeMapper.java*/
// 3. [查询单行; 返回Map集合]: 依据id查询Employee(假设没有封装pojo)
public Map<String, Object> selectOneReturnMap(int id);1
2
3
4
5
6
7<!--EmployeeMapper.xml-->
<!--3. [查询单行; 返回Map集合]-->
<select id="selectOneReturnMap" resultType="map">
select id, last_name, email, salary
from tbl_employee
where id=#{id};
</select>1
2
3// 3.[查询单行; 返回Map集合]
Map<String, Object> map = employeeMapper.selectOneReturnMap(1);
System.out.println(map);结果:

查询多行数据返回Map集合
resultType: map(小写)
注意: 需要在函数那里利用@MapKey指定Key是谁
示例:
1
2
3
4/*EmployeeMapper.java*/
// 4. [查询多行; 返回Map集合]: 查询所有Employee(假设咩有封装pojo)
public Map<Integer, Object> selectManyReturnMap();1
2
3
4
5<!--[查询多行; 返回Map集合]-->
<select id="selectManyReturnMap" resultType="map">
select id, last_name, email, salary
from tbl_employee;
</select>1
2
3
4/*调用时*/
// 4.[查询多行; 返回Map集合]
Map<Integer, Object> map = employeeMapper.selectManyReturnMap();
for(Map.Entry<Integer, Object> e: map.entrySet()) System.out.println(e);结果:

第五章 动态SQL
第一节 if where
where元素的作用:
子元素有内容(有进任何一个if/choose)才会插入”WHERE”
若子句的开头为 “AND” 或 “OR”,where 元素也会将它们去除。
注意: ==会去除开头的AND或OR, 所以每个if中and都在最前面==
使用场景: 查询员工信息, 条件不确定(传入一个
Employee emp其中emp不为空的字段都是需要查询的条件)1
2
3/*EmployeeMapper.java*/
// [where if] 查询员工信息, 条件不确定(只要不为null就作为条件)
List<Employee> selectEmployeeByOpt(Employee emp);1
2
3
4
5
6
7
8
9
10
11
12
13
14
15
16
17
18
19<!--EmployeeMapper.xml-->
<!--[where if] 查询员工信息, 条件不确定(只要不为null就作为条件)-->
<select id="selectEmployeeByOpt" resultType="Employee">
select id, last_name, email, salary, dept_id
from tbl_employee
<where>
<!--where 元素只会在子元素返回任何内容的情况下才插入 “WHERE” 子句。而且,若子句的开头为 “AND” 或 “OR”,where 元素也会将它们去除。-->
<!--where关键字, 每个if中and都在最前面-->
<if test="id!=null">
and id=#{id}
</if>
<if test="lastName!=null"> <!--成员变量(属性)-->
and last_name=#{lastName}
</if>
<if test="email!=null">
and email=#{email}
</if>
</where>
</select>
第二节 trim
trim的元素的作用: 去除/添加一些字符
prefix:添加前缀;
prefixOverrides:去掉前缀;
suffix:添加后缀;
suffixOverride: 去掉后缀
where和trim的联系:
<trim prefix="WHERE" prefixOverrides="AND |OR ">prefixOverrides 属性会忽略通过管道符分隔的文本序列(注意此例中的空格是必要的)。上述例子会移除所有 prefixOverrides 属性中指定的内容,并且插入 prefix 属性中指定的内容。如果写成
and| or后面留空格, 则OR不起作用;and|or这样紧贴着写没问题使用场景: 使用场景: 查询员工信息, 条件不确定(使用trim而不是where)
1
2
3/*EmployeeMapper.java*/
// [trim] 查询员工信息, 条件不确定
List<Employee> selectEmployeeUseTrim(Employee emp);1
2
3
4
5
6
7
8
9
10
11
12<!--EmployeeMapper.xml-->
<!--[trim prefix:添加前缀; prefixOverrides:去掉前缀; suffix:添加后缀; suffixOverride: 去掉后缀]
[trim] 查询员工信息, 条件不确定-->
<select id="selectEmployeeUseTrim" resultType="Employee">
select id, last_name, email, salary, dept_id
from tbl_employee
<trim prefix="where" prefixOverrides="and |or"> <!--和where元素等价的自定义trim元素为-->
<if test="id!=null">and id=#{id}</if>
<if test="lastName!=null">and last_name=#{lastName}</if>
<if test="email!=null">and email=#{email}</if>
</trim>
</select>
第三节 set
set: set元素会动态地在行首插入 SET 关键字,并会删掉额外的逗号(这些逗号是在使用条件语句给列赋值时引入的)
注意:==会去除结尾的逗号, 所以所有的if中在结尾后面加逗号==
set和trim的联系:
<trim prefix="SET" suffixOverrides=",">使用场景:更新员工信息, 需要更新的员工信息不确定(传入一个
Employee emp其中emp不为空的字段都是需要修改的字段)1
2
3/*EmployeeMapper.java*/
// [set] 更新员工信息, 需要更新的员工信息不确定(只要不为null, 就更新)
int updateEmployeeByOpt(Employee emp);1
2
3
4
5
6
7
8
9
10
11
12
13
14
15
16
17<!--EmployeeMapper.xml-->
<!--[set] 更新员工信息, 需要更新的员工信息不确定(只要不为null, 就更新)-->
<update id="updateEmployeeByOpt">
update tbl_employee
<set> <!--会去除结尾的逗号, 所以所有的if后面加,-->
<if test="deptId!=null">
dept_id=#{deptId},
</if>
<if test="lastName!=null">
last_name=#{lastName},
</if>
<if test="salary!=null">
salary=#{salary},
</if>
</set>
where id=#{id}
</update>
第四节 choose, when, otherwise
choose, when, otherwise: 类似于JSTL
注意:
使用场景: 查询员工信息, 只查询Employee字段中第一个不为空的字段, 如果全为null, 查询所有
1
2
3/*EmployeeMapper.java*/
// [choose, when, otherwise] 查询员工信息, 只查询一个条件, 如果都为null, 返回全部
List<Employee> selectEmployeeByOneOpt(Employee emp);1
2
3
4
5
6
7
8
9
10
11
12
13
14
15
16
17
18
19<!--EmployeeMapper.xml-->
<!--[choose, when, otherwise] 查询员工信息, 只查询一个条件, 如果都为null, 返回全部-->
<select id="selectEmployeeByOneOpt" resultType="Employee">
select id, last_name, email, salary, dept_id
from tbl_employee
<where>
<choose>
<when test="deptId!=null">
dept_id=#{deptId}
</when>
<when test="salary!=null">
salary=#{salary}
</when>
<otherwise>
1=1
</otherwise>
</choose>
</where>
</select>
第五节 foreach
foreach: 在需要循环的地方加入比如, 插入多个, 查询在一个集合中的等
foreach的属性:
- collection:
for(Auto item: collection) - item:
for(Auto item: collection) - separator:
where id in (1,2,3,4,5)就是这个逗号 - index: 当循环是map对象时, index为key, item为value
<index: item> - open: 加在整个循环最前面
where id in (1,2,3,4,5)1前面的(, 并不是每个都加 - close: 加在整个循环最后面, same as above
- collection:
注意: 关于List, Set, Map入参时collection应该写什么,List入参可以写[list/collection], Set入参可以写collection, Map入参只能用@Param命名参数; 注意当你忘记要写什么时------@Param或懒一点arg0
使用场景:
场景1: 查询员工id在集合ids中的所有员工信息
1
2
3select id, last_name, email, salary, dept_id
from tbl_employee
where id in(1,2,3)1
2
3/*EmployeeMapper.java*/
// [foreach] 查询员工id在集合ids中的所有员工信息
List<Employee> batchSelectEmployee( List<Integer> ids);1
2
3
4
5
6
7
8
9
10<!--EmployeeMapper.xml-->
<!--[foreach] 查询员工id在集合ids中的所有员工信息-->
<select id="batchSelectEmployee" resultType="Employee">
select id, last_name, email, salary, dept_id
from tbl_employee
where id in
<foreach open="(" collection="ids" item="id" separator="," close=")">
#{id}
</foreach>
</select>场景2: 传入map查询满足<id, dept_id>的员工信息
1
2
3SELECT * FROM tbl_employee
WHERE id IN (1, 3, 4)
AND dept_id IN (1, 2)1
2
3/*EmployeeMapper.java*/
// [foreach] map查询满足<id, dept_id>的员工信息
List<Employee> mapSelectEmployee(Map<Integer, Integer> info);1
2
3
4
5
6
7
8
9
10
11
12
13
14<!--EmployeeMapper.xml-->
<!--[foreach] map查询满足<id, dept_id>的员工信息-->
<select id="mapSelectEmployee" resultType="Employee">
SELECT * FROM tbl_employee
WHERE id IN
<!--这里的循环, 看起来是分开的, 但其实是一一对应的, 不是单查;sql语法-->
<foreach collection="info" item="value" index="key" open="(" separator="," close=")">
#{key}
</foreach>
AND dept_id IN
<foreach collection="info" item="value" open="(" separator="," close=")">
#{value}
</foreach>
</select>场景3: 批量插入员工信息 (注意item是每个员工, 所以取里面的成员变量(属性)要
emp.lastName)1
2
3
4insert into tbl_employee(last_name, email, salary, dept_id)
value ("Tom", "[email protected]",88.5,1),
("Jerry", "[email protected]",63.2,3),
("Kate", "[email protected]",43.3,2),1
2
3/*EmployeeMapper.java*/
// [foreach] 批量插入员工信息
int batchInsertEmployee( List<Employee> employees);1
2
3
4
5
6
7
8
9<!--EmployeeMapper.xml-->
<!--[foreach] 批量插入员工信息-->
<insert id="batchInsertEmployee" >
insert into tbl_employee(last_name, email, salary, dept_id)
value
<foreach collection="employees" item="emp" separator=",">
(#{emp.lastName}, #{emp.email}, #{emp.salary}, #{emp.deptId})
</foreach>
</insert>
第六节 重用SQL片段
重用SQL片段: 映射文件中的子标签之一
使用场景: 我们不提倡select *, 但有时候字段又很多, 此时可以用sql片段提取, 后期只需要include即可
1
2
3
4
5
6
7
8
9
10
11<sql id="emp_col"> <!--可重用SQL片段-->
id,
last_name,
email,
salary
</sql>
<select id="queryAll" resutlType="Emloyee">
select <include refid="emp_col"></include>
from tbl_employee
</select>
第六章 缓存机制
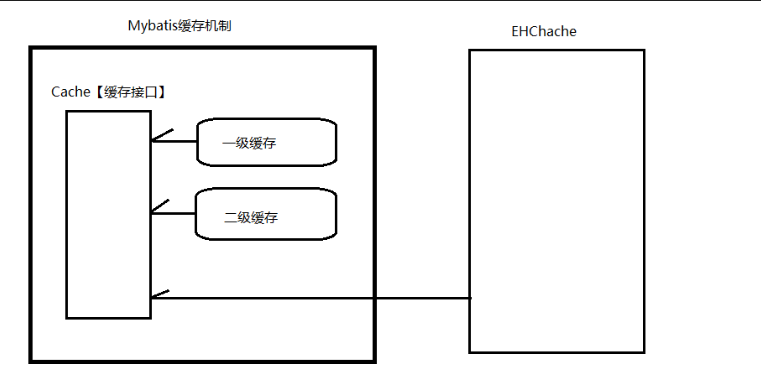
第一节 一级缓存
别名:【本地缓存(Local Cache)或 SqlSession级别缓存】
特点
- 一级缓存默认开启
- 不能关闭
- 可以清空
缓存原理
- 第一次获取数据时,先从数据库中加载数据,将数据缓存至Mybatis一级缓存中【缓存底层实现原理Map,key:hashCode+查询的SqlId+编写的sql查询语句+参数】
- 以后再次获取数据时,先从一级缓存中获取,如未获取到数据,再从数据库中获取数据。
一级缓存五种失效情况
不同的SqlSession对应不同的一级缓存
同一个SqlSession但是查询条件不同
同一个SqlSession两次查询期间执行了任何一次增删改操作都会==清空全部一级缓存的内容==
同一个SqlSession两次查询期间手动清空了缓存
sqlSession.clearCache()同一个SqlSession两次查询期间提交了事务
sqlSession.commit()
注意事项:
- 注意这里不管table的engine是InnoDB还是MyISAM等, 不管是否有事务系统, 只要执行了
sqlSession.commit就是清除一级缓存; - 同理期间只要进行了增删改的操作, 无论是否提交到了数据库, 都会清空一级缓存
- 注意这里不管table的engine是InnoDB还是MyISAM等, 不管是否有事务系统, 只要执行了
第二节 二级缓存
别名: 【全局作用域缓存 或 SqlSessionFactory级别缓存】
特点
- 二级缓存默认关闭,需要开启才能使用
- 二级缓存需要
sqlSession.commit()或sqlSession.close()时,才会将一级缓存的内容转移到二级缓存
缓存原理
- 第一次获取数据时,先从数据库中获取数据,将数据缓存至一级缓存;当提交或关闭SqlSession时,将数据缓存至二级缓存
- 以后再次获取数据时,先从一级缓存中获取数据,如一级缓存没有指定数据,再去二级缓存中获取数据。如二级缓存也没有指定数据时,需要去数据库中获取数据。
二级缓存的失效情况
- 在两次查询之间,执行增删改操作,会同时==清空一级缓存和二级缓存==
注意事项:
- sqlSession.clearCache():只是用来清除一级缓存。二级缓存只能被刷新(通过设置flushInterval属性), 不能被清空(但是你关闭cacheEnabled相当于清空了)
如何开启二级缓存:
① 全局配置文件中开启二级缓存
<setting name="cacheEnabled" value="true"/>(默认开启)② 需要使用二级缓存的映射文件处使用cache元素(子标签)配置缓存
<cache/>如下是其属性eviction=“FIFO”:缓存清除【回收】策略。
- LRU – 最近最少使用的:移除最长时间不被使用的对象。
- FIFO – 先进先出:按对象进入缓存的顺序来移除它们。
flushInterval:刷新间隔,单位ms
size:引用数目,正整数(建议512的倍数)
readOnly:只读,true/false
<cache eviction="FIFO" flushInterval="60000" size="1024"/>③ 注意:POJO需要实现Serializable接口
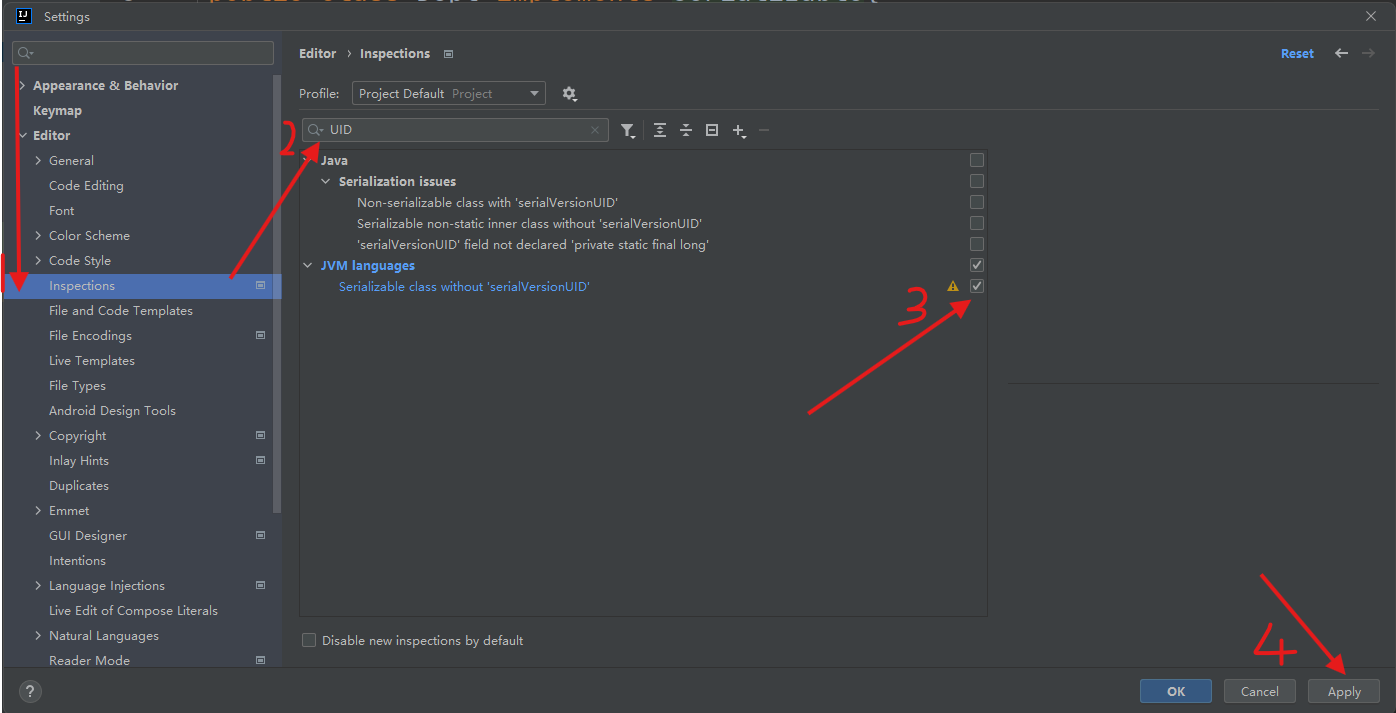
[^如何开启序列号alter+enter开启fix自动生成UID]: 开启后在类继承了Serializable接口后, 在类名后面alter+enter自动生成UID
第三节 第三方缓存
作用: 可以本地持久化存储
常用的第三方缓存: EhCache (EhCache 是一个纯Java的进程内缓存框架)
开启步骤
①开启二级缓存, 只有开启二级缓存才能使用第三方缓存
② EhCache的maven导包
导入jar包
1
2
3
4
5
6
7
8
9
10
11
12
13
14<!-- mybatis-ehcache -->
<dependency>
<groupId>org.mybatis.caches</groupId>
<artifactId>mybatis-ehcache</artifactId>
<version>1.0.3</version>
</dependency>
<!-- slf4j-log4j12 -->
<dependency>
<groupId>org.slf4j</groupId>
<artifactId>slf4j-log4j12</artifactId>
<version>1.6.2</version>
<scope>test</scope>
</dependency>编写配置文件【ehcache.xml】
1
2
3
4
5
6
7
8
9
10
11
12
13
14
15
16
17
<ehcache xmlns:xsi="http://www.w3.org/2001/XMLSchema-instance"
xsi:noNamespaceSchemaLocation="../config/ehcache.xsd">
<!-- 磁盘保存路径 -->
<diskStore path="D:\桌面文件夹\专业学习\Mybatis学习\mybatis\ehcache" />
<defaultCache
maxElementsInMemory="512"
maxElementsOnDisk="10000000"
eternal="false"
overflowToDisk="true"
timeToIdleSeconds="120"
timeToLiveSeconds="120"
diskExpiryThreadIntervalSeconds="120"
memoryStoreEvictionPolicy="LRU">
</defaultCache>
</ehcache>
③ mybatis映射文件中
1
2<!--开始第三方缓存(ehcache) 不需要其它属性了-->
<cache type="org.mybatis.caches.ehcache.EhcacheCache"/>
注意事项
- 第三方缓存,需要建立在二级缓存基础上【需要开启二级缓存,第三方缓存才能生效】
- 如何让第三方缓存失效【将二级缓存设置失效即可】
第七章 逆向工程【插件】【了解】
正向工程: java中的pojo=>数据库中的(表)
逆向工程: Table=>Pojo, XXXMapper.java, XXXMapper.xml
第一节 MyBatis Generator插件
- 官网地址: https://mybatis.org/generator/
- 简介: 是一个专门为MyBatis框架使用者定制的代码生成器, 可以快速的更具表生成对应的映射文件, 接口, pojo。但只可以生成单表的CRUD, 表链接, 存储过程等复杂sql的定义还是需要我们手动编写
第二节 具体实现步骤
7.2.1 STEP1: 配置pom.xml
1 | <!-- mybatis-generator-core --> |
7.2.2 STEP2: 编写配置文件【mbg.xml】
1 |
|
7.2.3 STEP3: 运行
1 | List<String> warnings = new ArrayList<String>(); |
第八章 分页查询【插件】【重点】
在Mybatis中分页是用插件来实现的; 分页的好处 ①提高用户体验 ②降低服务器压力
第一节 设计Page类
46/60 46: 当前页码 60: 总页码
select * from tbl_employee where 1=1 limit x, y – x: 开启的下标[0开始], y: 每页显示数量
- pageNum:当前页码
- pages:总页数【计算:总页数=⌈总数据数量/每页显示数据数量⌉】
- total:总数据数量
- pageSize:每页显示数据数量
- List
:当前页显示数据集合
第二节 PageHelper插件
第三节 具体实现步骤
8.3.1 STEP1: 配置pom.xml
1 | <!-- 分页: PageHelper --> |
8.3.2 STEP2: 在mybatis-config.xml中配置分页插件
1 | <typeAliases></typeAliases> |
8.3.3 STEP3: 查询之前, 使用PageHelper开启分页
- 这里接收page后, 可以通过page获取上面”设计Page类”中的一些分页数据
1 | Page<Object> page = PageHelper.startPage(6, 3);// 注意这里的第一个参数是第几页(不是Limit的第一个参数) |
8.3.4 STEP4: 查询之后, 最后将结果封装Pagelnfal中,使用Pagelnfo实现后续分页效果
1 | List<Employee> employees = employeeMapper.selectAll(); //执行查询 |
- Title: 3.Mybatis学习
- Author: 明廷盛
- Created at : 2025-02-15 21:19:10
- Updated at : 2025-02-15 21:34:00
- Link: https://blog.20040424.xyz/2025/02/15/😼Java全栈工程师/第三部分 SSM/3.Mybatis学习/
- License: All Rights Reserved © 明廷盛