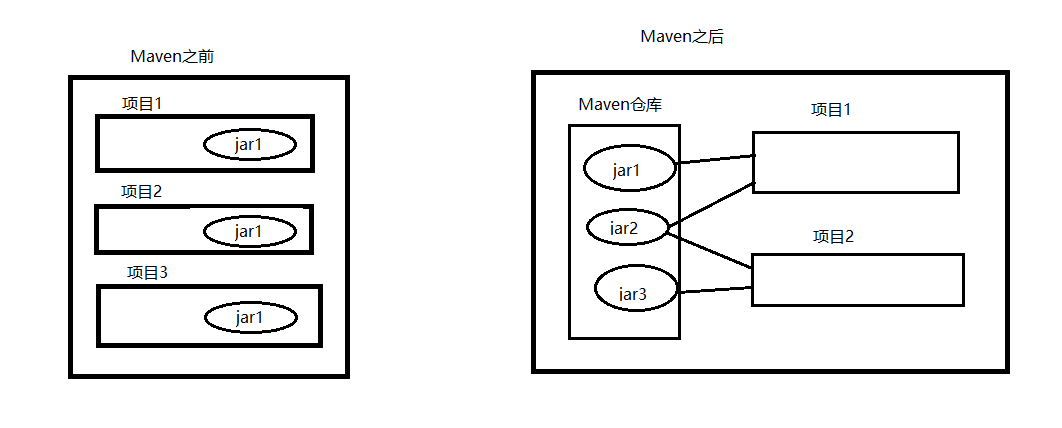
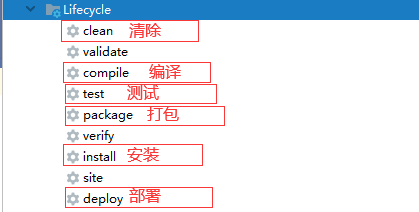
第一章 为什么使用Maven 获取jar包使用Maven之前,自行在网络中下载jar包,效率较低。如【谷歌、百度、CSDN….】 使用Maven之后,统一在一个地址下载资源jar包【阿里云镜像服务器等…】 添加jar包使用Maven之前,将jar复制到项目工程中,jar包添加到项目中,相对浪费存储空间 使用Maven之后,jar包统一存储Maven本地仓库,使用坐标方式将jar包从仓库引入到项目中 使用Maven便于解决jar包冲突及依赖 问题 第二章 什么是Maven Maven字面意:专家、内行 Maven是一款自动化构建工具,专注服务于Java平台的项目构建 和依赖管理 。 依赖管理:jar之间的依赖关系,jar包管理问题统称为依赖管理 项目构建 :项目构建不等同于项目创建项目构建是一个过程【7步骤组成】,项目创建是瞬间完成的清理:mvn clean 编译:mvn compile 测试:mvn test 报告: 打包:mvn package 安装:mvn install 部署: 第三章 Maven基本使用 第一节 Maven准备 注意:IDEA2019.1.x 最高支持Maven的3.6.0
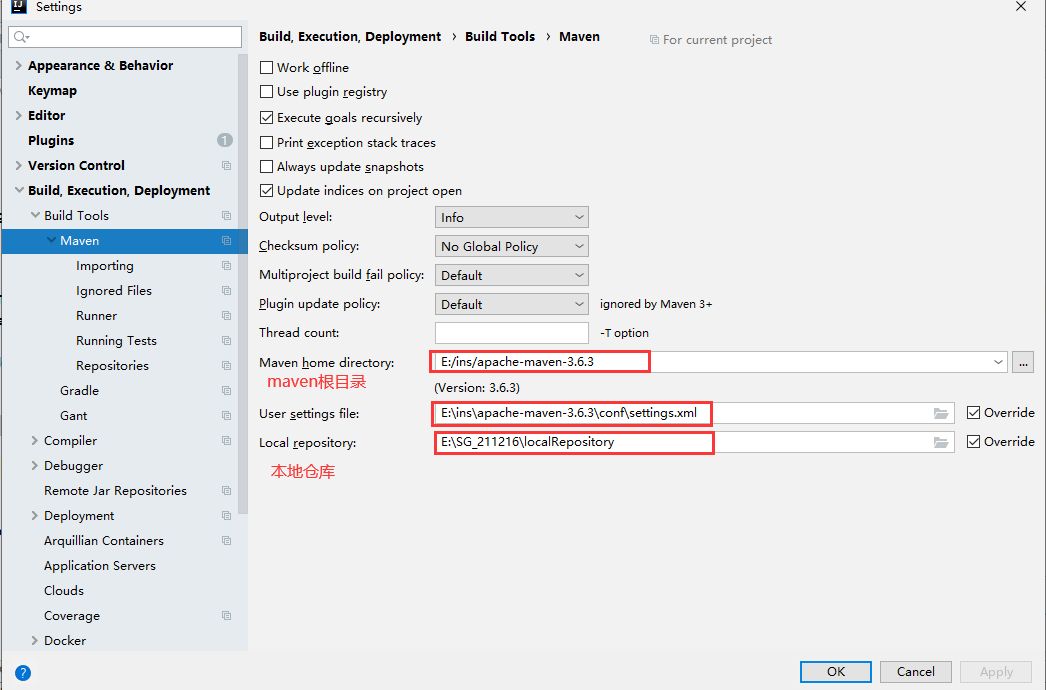
第二节 Settings.xml文件配置 该配置文件建议复制一份到C:/User/.m2/目录下, 因为IDEA尽管设置用D盘的目录, 还是会读C盘的, 干脆直接换掉
STEP1: 设置本地仓库 默认在: C:/User/.m2/repository Maven配置文件位置:maven根目录/conf/settings.xml 1 2 3 4 5 6 7 <localRepository > E:\SG_220106\LocalRepository</localRepository >
SETP2: 设置阿里云镜像服务器 1 2 3 4 5 6 7 8 9 10 11 12 13 14 15 16 17 18 19 20 21 <mirrors > <mirror > <id > nexus-aliyun</id > <mirrorOf > central</mirrorOf > <name > Nexus aliyun</name > <url > https://maven.aliyun.com/repository/public</url > </mirror > </mirrors >
STEP3: 设置使用JDK版本【1.8|JDK8】 1 2 3 4 5 6 7 8 9 10 11 12 13 14 15 16 17 18 19 <profiles > <profile > <id > jdk-1.8</id > <activation > <activeByDefault > true</activeByDefault > <jdk > 1.8</jdk > </activation > <properties > <maven.compiler.source > 1.8</maven.compiler.source > <maven.compiler.target > 1.8</maven.compiler.target > <maven.compiler.compilerVersion > 1.8</maven.compiler.compilerVersion > </properties > </profile > </profiles > <activeProfiles > <activeProfile > myjdk</activeProfile > </activeProfiles >
STEP4: 测试Maven是否搭建成功 进入项目名根目录【在根目标输入cmd即可】 mvn clean mvn compile mvn test-compile mvn test mvn package mvn install setting.xml 完整 1 2 3 4 5 6 7 8 9 10 11 12 13 14 15 16 17 18 19 20 21 22 23 24 25 26 27 28 29 30 31 32 33 34 35 36 37 38 39 40 41 42 43 44 45 46 <?xml version="1.0" encoding="UTF-8" ?> <settings xmlns ="http://maven.apache.org/SETTINGS/1.0.0" xmlns:xsi ="http://www.w3.org/2001/XMLSchema-instance" xsi:schemaLocation ="http://maven.apache.org/SETTINGS/1.0.0 http://maven.apache.org/xsd/settings-1.0.0.xsd" > <localRepository > D:\ins\apache-maven-3.6.3\localRepository</localRepository > <pluginGroups > </pluginGroups > <proxies > </proxies > <servers > </servers > <mirrors > <mirror > <id > nexus-aliyun</id > <mirrorOf > central</mirrorOf > <name > Nexus aliyun</name > <url > https://maven.aliyun.com/repository/public</url > </mirror > </mirrors > <profiles > <profile > <id > myjdk</id > <activation > <activeByDefault > true</activeByDefault > <jdk > 1.8</jdk > </activation > <properties > <maven.compiler.source > 1.8</maven.compiler.source > <maven.compiler.target > 1.8</maven.compiler.target > <maven.compiler.compilerVersion > 1.8</maven.compiler.compilerVersion > </properties > </profile > </profiles > <activeProfiles > <activeProfile > myjdk</activeProfile > </activeProfiles > </settings >
第四章 Maven及Idea的相关应用 第一节 将Maven整合到IDEA中
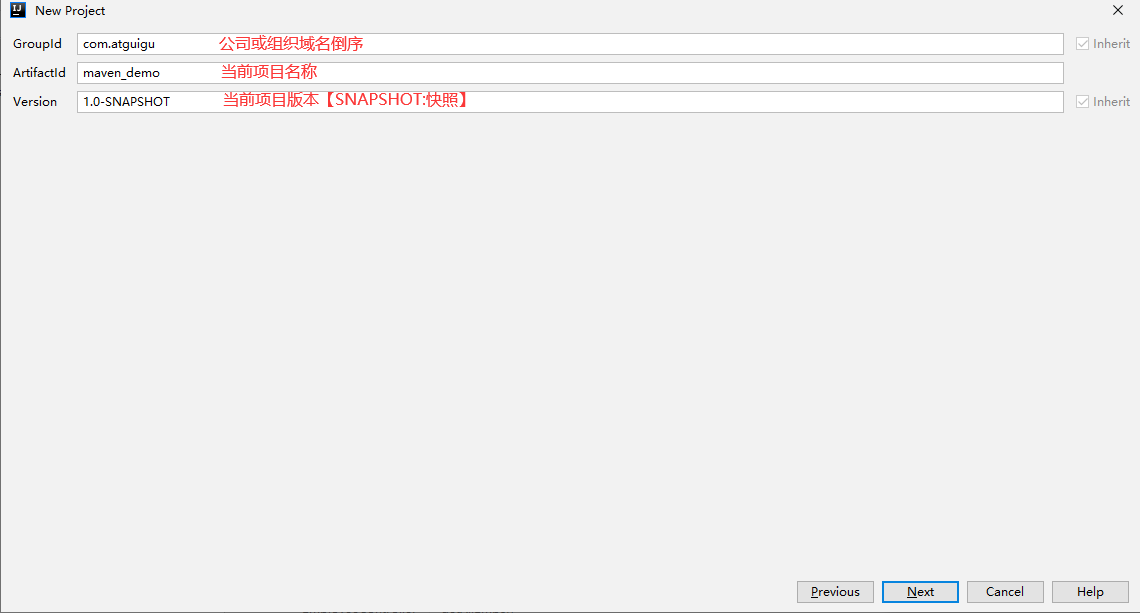
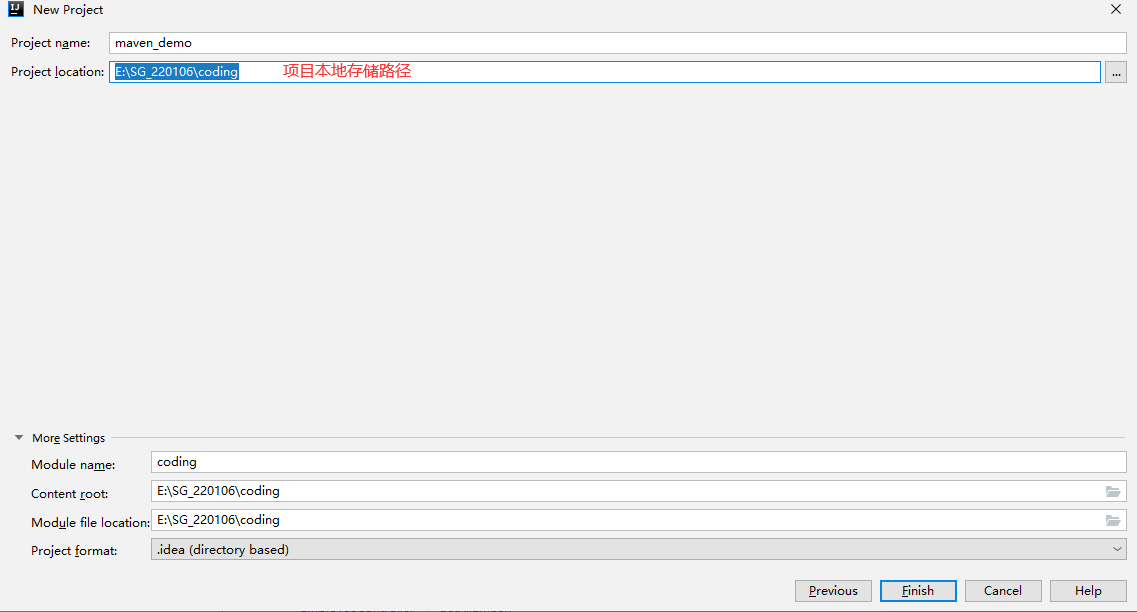
第二节 在IDEA中新建Maven工程
第五章 Maven核心概念 第一节 Maven的POM POM全称:Project Object Model【项目对象模型】,将项目封装为对象模型,便于使用Maven管理【构建】项目 pom.xml常用标签 1 2 3 4 5 6 7 8 9 10 11 12 13 14 15 16 17 18 19 20 21 22 23 <?xml version="1.0" encoding="UTF-8" ?> <project xmlns ="http://maven.apache.org/POM/4.0.0" xmlns:xsi ="http://www.w3.org/2001/XMLSchema-instance" xsi:schemaLocation ="http://maven.apache.org/POM/4.0.0 http://maven.apache.org/xsd/maven-4.0.0.xsd" > <parent > <artifactId > maven_demo</artifactId > <groupId > com.atguigu</groupId > <version > 1.0-SNAPSHOT</version > </parent > <modelVersion > 4.0.0</modelVersion > <artifactId > maven_helloworld</artifactId > <dependencies > <dependency > <groupId > junit</groupId > <artifactId > junit</artifactId > <version > 4.12</version > <scope > test</scope > </dependency > </dependencies > </project >
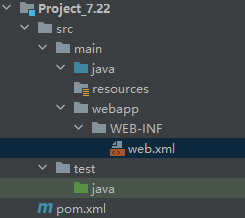
第二节 Maven约定的目录结构 项目名 src【书写java源代码】main【书写java主程序代码】java【书写java代码】 resources【书写配置文件代码】 test【书写测试代码】 pom.xml【书写配置文件代码】 target【编译后目录结构】 第三节 Maven生命周期 Maven生命周期:按照顺序执行各个命令,Maven生命周期包含以下三个部分组成Clean LifeCycle:在进行真正的构建之前进行一些清理工作。 Default LifeCycle:构建的核心部分,编译,测试,打包,安装,部署等等。 Site LifeCycle:生成项目报告,站点,发布站点。 第四节 Maven插件和目标 插件:插件本质是由jar包和配置文件组成 目标:每个插件都能实现多个功能,每个功能就是一个插件目标。 第五节 Maven的仓库分类及内容【重要】 本地仓库:为当前计算机提供maven服务 远程仓库:为其他计算机也可以提供maven服务私服:架设在当前局域网环境下,为当前局域网范围内的所有Maven工程服务。 中央仓库:架设在Internet上,为全世界所有Maven工程服务。 中央仓库的镜像:架设在各个大洲,为中央仓库分担流量。减轻中央仓库的压力,同时更快的响应用户请求。 仓库中的文件类型【jar包】Maven的插件 第三方框架或工具的jar包 自己研发的项目或模块 第六节 Maven的坐标【重要】 作用:使用坐标引入jar包 坐标由g-a-v组成groupId :公司或组织的域名倒序+当前项目名称artifactId :当前项目的模块名称version :当前模块的版本 注意g-a-v:本地仓库jar包位置 a-v:jar包全名 坐标应用 坐标参考网址:http://mvnrepository.com 语法,示例 1 2 3 4 5 6 7 8 9 10 11 12 13 14 15 16 17 18 19 20 21 22 23 <dependencies > <dependency > <groupId > junit</groupId > <artifactId > junit</artifactId > <version > 4.12</version > <scope > test</scope > </dependency > <dependency > <groupId > javax.servlet</groupId > <artifactId > javax.servlet-api</artifactId > <version > 4.0.1</version > <scope > provided</scope > </dependency > <dependency > <groupId > org.springframework</groupId > <artifactId > spring-context</artifactId > <version > 5.3.17</version > </dependency > </dependencies >
第六章 Maven的依赖管理 第一节 依赖范围 依赖语法:<scope> compile【默认值】:在main、test、Tomcat【服务器】下均有效。 test:只能在test目录下有效 provided:在main、test下均有效,Tomcat【服务器】无效。 第二节 依赖传递性 路径最短者有先【就近原则】 先声明者优先 注意:Maven可以自动解决jar包之间的依赖问题 第三节 Maven中统一管理版本号 1 2 3 4 5 6 7 8 9 10 <properties > <spring-version > 5.3.17</spring-version > </properties > <dependencies > <dependency > <groupId > org.springframework</groupId > <artifactId > spring-beans</artifactId > <version > ${spring-version}</version > </dependency > </dependencies >
第七章 Maven的继承 第一节 为什么需要继承 如子工程大部分都共同使用jar包,可以提取父工程中,使用【继承原理】在子工程中使用 父工程打包方式,必须是pom方式 第二节 Maven继承方式一:强制 在父工程中的pom.xml中导入jar包,在子工程中统一使用。【所有子工程强制引入父工程jar包】 1 2 3 4 5 6 7 8 9 <packaging > pom</packaging > <dependencies > <dependency > <groupId > junit</groupId > <artifactId > junit</artifactId > <version > 4.12</version > <scope > test</scope > </dependency > </dependencies >
第三节 Maven继承方式二:选择性依赖 1 2 3 4 5 6 7 8 9 10 11 <packaging > pom</packaging > <dependencyManagement > <dependencies > <dependency > <groupId > junit</groupId > <artifactId > junit</artifactId > <version > 4.12</version > <scope > test</scope > </dependency > </dependencies > </dependencyManagement >
1 2 3 4 5 6 7 8 9 10 11 12 <parent > <artifactId > maven_demo</artifactId > <groupId > com.atguigu</groupId > <version > 1.0-SNAPSHOT</version > <relativePath > ../pom.xml</relativePath > </parent > <dependencies > <dependency > <groupId > junit</groupId > <artifactId > junit</artifactId > </dependency > </dependencies >
第四节 Maven的聚合 为什么使用Maven的聚合优势:只要将子工程聚合到父工程中,就可以实现效果:安装或清除父工程时,子工程会进行同步操作。 注意:Maven会按照依赖顺序自动安装子工程 语法 1 2 3 4 5 <modules > <module > maven_helloworld</module > <module > HelloFriend</module > <module > MakeFriend</module > </modules >
第九章 Maven安装Web项目 第一节 方法一: 手动构建 STEP1: 配置pom.xml 1 2 3 4 5 6 7 <dependency > <groupId > javax.servlet</groupId > <artifactId > javax.servlet-api</artifactId > <version > 4.0.0</version > <scope > provided</scope > </dependency >
STEP2: 手动为web项目分包
STEP3: web.xml直接copy 1 2 3 4 5 6 7 8 <!DOCTYPE web-app PUBLIC "-//Sun Microsystems, Inc.//DTD Web Application 2.3//EN" "http://java.sun.com/dtd/web-app_2_3.dtd" > <web-app > <display-name > Archetype Created Web Application</display-name > </web-app >
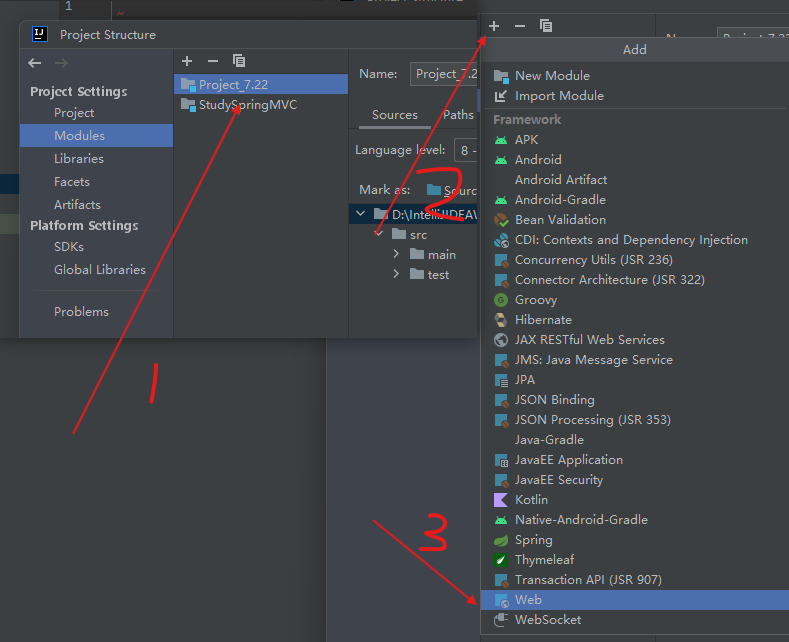
STEP4: 添加web模块
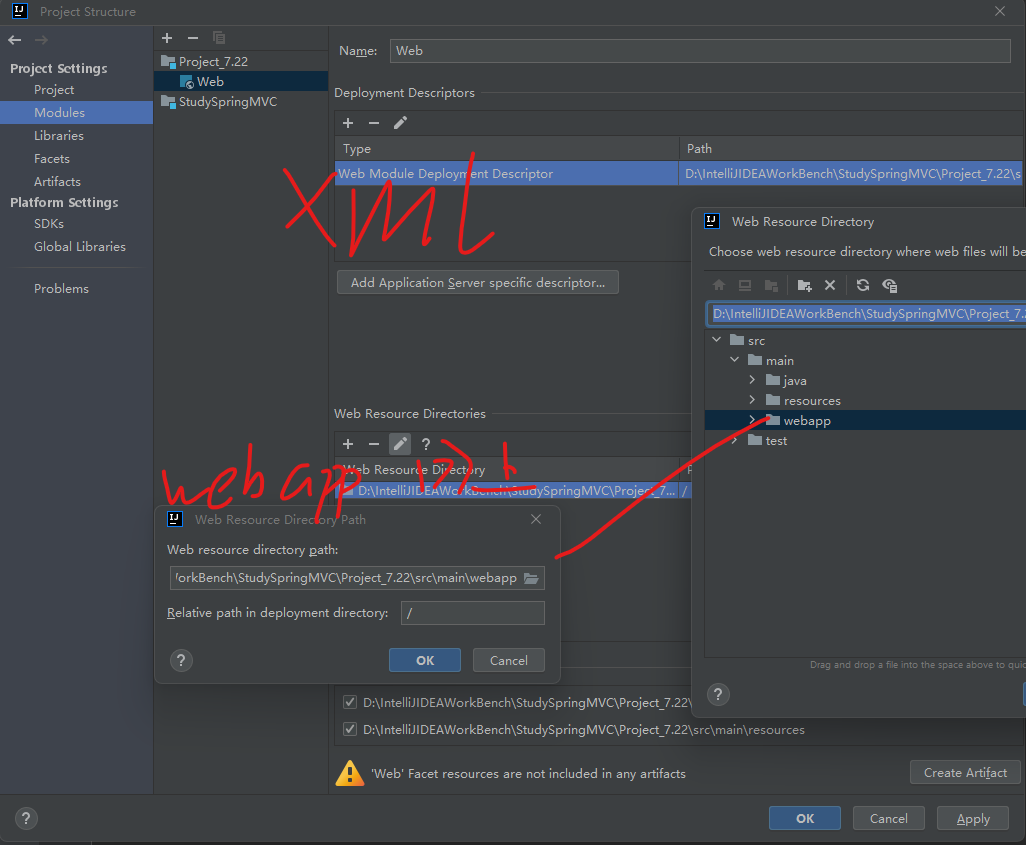
STEP5: 修改web.xml路径
STEP6: 修改webapp路径
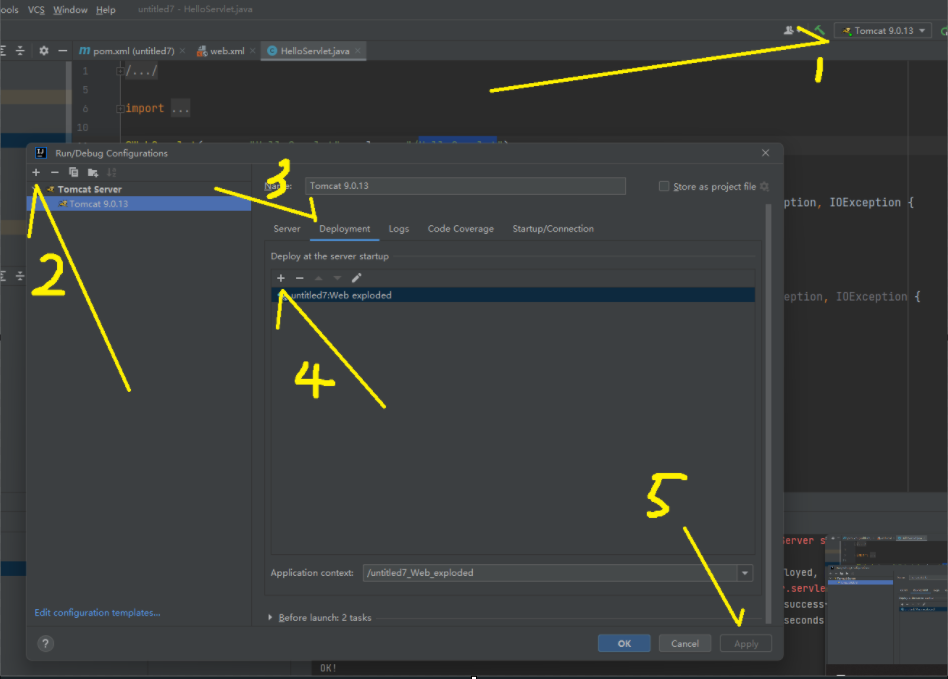
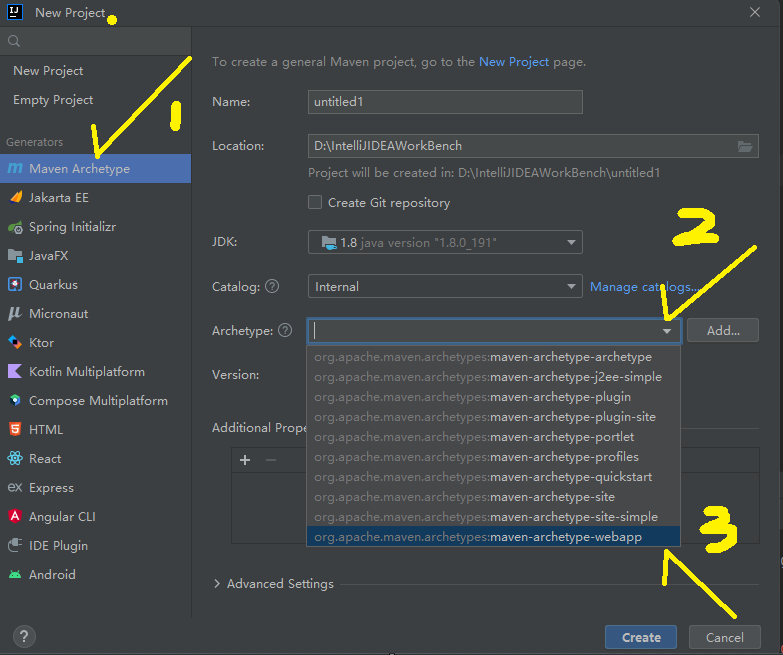
STEP7: 创建工件 在Project Structure–> Artifacts 中 创建”工件”, 如果像上面那张图一样, 在Modules中有⚠️提示的话, 直接Create Artficat最好 STEP8: Tomcat和JavaWEB一样 和普通web项目一样, 右上角选Tomcat并添加工件即可 注意 只有①pom.xml添加了Servlet-api的jar ②为当前项目添加了web模块时才可以在java中右键提示生成servlet类 和Maven的生命周期无关, 原来普通的web项目怎么运行, 这个就怎么运行(在Service中运行Tomcat, ) 如果上述方式无法配置成功: 看这个 第二节 方法二: 使用骨架(保守) STEP1: 创建MAVEN WEB骨架工程 建议Add新的版本 1.4, 依次填入即可