1.SpringFramework学习

第一章 学习SpringFramework的切入点
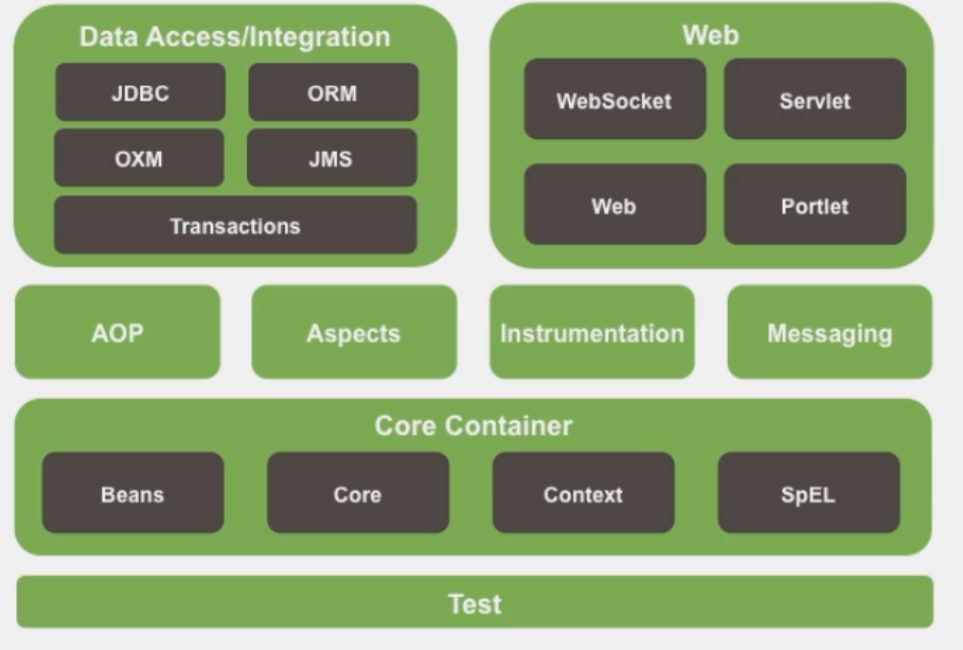
官网链接SpringFramework
- IOC(Inversion Of Control)控制反转: 指的是将对象的创建权交给Spring 去创建。使用Spring之前,对象的创建都是由我们自己在代码中new创建。而使用Spring之后。对象的创建都是由给了Spring框架。
- DI(Dependency Injection)依赖注入: 是指对象的属性不需要手动调用setXXX方法去设置,而是通过Configration赋值。
- AOP(Aspect Oriented Programming)面向切面编程: 在不修改源代码的基础上进行功能扩展。
- JDBCTemplate: Spring的”Mybatis”
- 声明式事务: 事务
在开发中不成文的规定 ==约定:约束>配置【注解>XML】>代码==
第二章 关于测试
第一节 Spring集成Junit4
- ==一定要导入spring-test包==
public class TestSpringJunit4 {
第二节 Spring集成Junit5
- 方式一:
public class Test01 {}
- 方式二[推荐]:
public class Test01 {}
第三章 HelloSpring

第一节 STEP1: pom.xml配置
<!--pom.xml-->
<!--导入spring-context-->
<dependency>
    <groupId>org.springframework</groupId>
    <artifactId>spring-context</artifactId>
    <version>5.3.1</version>
</dependency>
第二节 STEP2: applicationContext.xml配置
- 配置文件名称:applicationContext.xml【beans.xml或spring.xml】
- 配置文件路径:src/main/resources
<!--applicationContext.xml-->
<beans xmlns="http://www.springframework.org/schema/beans"
xmlns:xsi="http://www.w3.org/2001/XMLSchema-instance"
xsi:schemaLocation="http://www.springframework.org/schema/beans http://www.springframework.org/schema/beans/spring-beans.xsd">
<!--IOC(Inversion Of Control)控制反转: bean相当于在容器中实例化对象-->
<bean id="StuMingTingSheng" class="com.mts.pojo.Student">
<!--DI(Dependence Injection)依赖注入: 相当于给这个对象中的属性赋值-->
<property name="stuName" value="明廷盛"/>
<property name="stuNumber" value="2240110323"/>
</bean>
</beans>
第三节 STEP3: 如何测试
// 1.创建容器对象
ApplicationContext springIOC = new ClassPathXmlApplicationContext("applicationContext.xml");
// 2.从容器中根据id拿对象
Student stuMingTingSheng = springIOC.getBean("StuMingTingSheng", Student.class);
System.out.println(stuMingTingSheng);
第四章 关于注解开发
注解是Spring中极为重要的特点, 如果要在Spring中使用注解就行开发的话, 需要告诉Spring需要在哪些文件中扫描注解;
①XML配置注解扫描, 需要配置applicationContext.xml文件;
②完全注解开发需要写一个Config类告诉Spring在哪写文件中开启了注解;
第一节 XML配置注解扫描
4.1.1 默认注解扫描
<!--applicationContext.xml-->
<!--扫描该包, 及其子包中的所有注解, 支持,指定多个包-->
<context:component-scan base-package="com.mts,com.nb"/>
4.1.2 包含扫描 <context:include-filter>
语法: 可以设置只扫描什么包(assignable), 或只扫描什么注解(annotation)
注意⚠️: 使用包含扫描之前,必须设置use-default-filters=”false”【关闭当前包及其子包的扫描】
示例代码:
<!--applicationContext.xml-->
<!--包含扫描-->
<context:component-scan base-package="com.mts" use-default-filters="false">
    <context:include-filter
		type="annotation" expression="org.springframework.stereotype.Component"/>
</context:component-scan>
4.1.3 排除扫描<context:exclude-filter>
- 语法: 可以设置==不==扫描什么包(assignable), 或只扫描什么注解(annotation)
- 注意⚠️: 这个不用
use-default-filters=”false”【易错】 - 示例代码:
<!--applicationContext.xml-->
<!--排除扫描-->
<context:component-scan base-package="com.mts" >
    <context:exclude-filter
		type="annotation" expression="org.springframework.stereotype.Service"/>
</context:component-scan>
第二节 完全注解开发的使用步骤
4.2.1 STEP1: 创建配置类 (例如名字叫做SpringConfig)
4.2.2 STEP2: 在class上面添加注解
- @Configuration:标识当前类是一个配置类,作用:代替XML配置文件
- @ComponentScan:设置组件扫描当前包及其子包
/*SpringConfig.java*/
public class SpringConfig {}
4.2.3 STEP3: 测试
测试时不再使用
ClassPathXmlApplicationContext("applicationContext.xml");改为
AnnotationConfigApplicationContext(SpringConfig.class);
/*test.java*/
ApplicationContext ioc = new AnnotationConfigApplicationContext(SpringConfig.class);
DeptDaoImpl deptDao = ioc.getBean("deptDao", DeptDaoImpl.class);
第三节 完全注解开发如何扫描包
4.3.1 包含扫描
- 示例代码: 需求: 只扫描
@Repository注解
/*SpringConfig.java*/
public class SpringConfig {}
4.3.2 排除扫描
- 示例代码: 需求: 不扫描
DeptDaoImpl这个实现类中的注解
/*SpringConfig.java*/
public class SpringConfig {}
第五章 IOC
在容器(applicationContext.xml)中创建对象; 开发人员可以在开发中从配置文件中获取。
bean既然是对象, 那么就有作用域和生命周期等
第一节 如何在容器中创建对象
5.1.1 XML创建对象
普通创建
标签
类 <bean>集合/映射 <util:list><util:map>属性
属性 作用 id bean的唯一标识 class 定义bean的类型【class全类名】 注意⚠️: 只要调用了这个标签, 绝对会调用这个对象的构造方法, 也只有这个标签可以调用构造方法
<bean id="StuMingTingSheng" class="com.mts.pojo.Student"></bean>
干预创建(FactoryBean)
使用场景: bean不是只针对于pojo对象, 是针对所有对象, 有些对象可能不需要get和set方法, 只是想创建出来; 又或者我创建的时候想打印一句话, 之类的; 此时我们就可以干预对象的创建
干预创建的步骤如下:
STEP1: 创建一个类继承
FactoryBean<Object>Object是你想对哪个对象的创建进行干预, 并重写其中的getObject()和getObjectType()方法/*DeptFactoryBean.java*/
package com.mts.factory;
import com.mts.pojo.Dept;
import org.springframework.beans.factory.FactoryBean;
public class DeptFactoryBean implements FactoryBean<Dept> {
public Dept getObject() throws Exception {
Dept dept = new Dept(1, "校长部", null, null);
System.out.println("这里是通过FactoryBean干扰创建的Dept类");
return dept;
}
public Class<?> getObjectType() {
return Dept.class;
}
}STEP2: 在applicationcontext.xml中, 正常调用
<bean>标签, 只不过class写刚刚继承的类<bean id="factoryBean" class="com.mts.factory.DeptFactoryBean"/>
STEP3: 测试
/*FactoryBeanTest.java*/
ApplicationContext ioc = new ClassPathXmlApplicationContext("applicationContext_factory.xml");
Dept factoryBean = ioc.getBean("factoryBean", Dept.class); // 注意这里的对象是Dept
System.out.println(factoryBean);
5.2.1 注解创建对象
不完全注解开发,需要写一个
applicationContext.xml文件当中开启组件扫描
<context:component-scan base-package="com.atguigu"></context:component-scan>
注解写的位置: 在类上面标识
装配对象四个注解
@Component:装配普通组件(pojo等)到IOC容器@Repository:装配持久化层组件(Dao等)到IOC容器@Service:装配业务逻辑层组件(Service等)到IOC容器@Controller:装配控制层|表示层组件(Servlet等)到IOC容器
对应关系:
- beanIId:
- 可以用value值指定;
@Component(value="deptMing") - 当注解中只使用一个value属性时,value关键字可省略;
@Component("deptMing") - 不指定默认为类名首字母小写
@Component
- 可以用value值指定;
- class: 注解写的位置: 在类上面标识.
- beanIId:
注意⚠️:
- Spring本身不区分四个注解【四个注解本质是一样的@Component】,提供四个注解的目的只有一个:提高代码的可读性
- 这样装配的对象, 都在同一个
applicationContext.xml里面, 注意不要重名
第二节 如何从容器中获取对象
STEP1: 获取容器
接口:
- BeanFactory:①IOC容器的基本实现,是Spring内部的使用接口 ②是面向Spring本身的,不是提供给开发人员使用的。
- **ApplicationContext:**①BeanFactory的子接口,提供了更多高级特性。面向开发人员
- ConfigurableApplicationContext:①提供了手动关闭容器的方法
方法:
- **ClassPathXmlApplicationContext:**基于类路径检索Spring配置文件(.xml)
- FileSystemXmlApplicationContext:基于文件系统检索
ApplicationContext springIOC = new ClassPathXmlApplicationContext("applicationContext.xml");
9. **STEP2: 获取容器中的对象**
1. **getBean(String beanId,Clazz clazz):通过beanId和Class获取对象**推荐使用
```java
Student stuMingTingSheng = springIOC.getBean("StuMingTingSheng", Student.class);
### 第三节 bean的作用域
* 语法: 在`<bean>`标签中, 添加`scope`属性(Singleton, prototype, request, session)
* 四个作用域
* **singleton【default】:单例**【在容器中无论getBean("idName")多少次, 都是获取同一个对象】
- 对象创建时机:**创建容器对象时**,创建对象执行
* **prototype:多例**【在容器中getBean("idName")一次, 就获取一个对象, 每个对象之间不同】
- 对象创建时机:**getBean()方法被调用时**,创建对象执行
* **request:请求域**【Spring Framework中没有】
- 当前请求有效,离开请求域失效
- 当前请求:**URL不变即为当前请求**
* **session:会话域**【Spring Framework中没有】
- 当前会话有效,离开当前会话失效
- 当前会话:**当前浏览不关闭不更换即为当前会话**
### 第四节 bean的生命周期
> bean的完整生命周期如图表格**列**所示, 其中如果不重写, 会调用spring默认的方法

#### 5.4.1 重写init/destroy方法
* ①使用`<bean>`标签, 调用构造方法, 实例化对象
* ②为bean的属性设置值和对其他bean的引用 `<property name="stuName" value="Tom"/>`
* ③调用 `init-method()`方法, 必须在POJO中写这个方法, 同时在`<bean>`中init-method属性指定该方法.
* ④使用该`<bean>`对象
* ⑤**当容器关闭时**,调用bean的销毁方法 `destroy-method()`, 同③
```java
/*Student.java*/
public class Student() {
...
public void init_method(){ System.out.println("2.调用初始化方法");
public void destroy_method() { System.out.println("3.调用摧毁方法"); }
...
}
<!--applicationContext_lifeCycle.xml-->
<!--需要指定init和destroy方法是哪一个-->
<bean id="lifeCycle" class="com.mts.pojo.Student"
      init-method="init_method"
      destroy-method="destroy_method">
    <property name="stuName" value="Tom"/>
    <property name="stuNum" value="101"/>
</bean>
/*test.java*/
/*使用ConfigurableApplicationContext才能关闭容器*/
ConfigurableApplicationContext iocConfigurable = new ClassPathXmlApplicationContext("applicationContext_lifeCycle.xml");
Student lifeCycle = iocConfigurable.getBean("lifeCycle", Student.class);
iocConfigurable.close();
5.4.2 重写初始化前后方法(Post Processor)
- 作用: 在调用初始化方法前后对bean进行额外的处理。
- 实现步骤:
- ①新写一个类, 实现
BeanPostProcessor接口 - ②重写
postProcessBeforeInitialization(Object, String)和postProcessAfterInitialization(Object, String)方法 - 在容器中装配后置处理器
- ①新写一个类, 实现
- 注意: 装配后置处理器会为*当前容器(yyy.xml)中所有*
<bean>**均装配,不能为局部bean装配后置处理器
/*PostProcessor*/
public class PostProcessor implements BeanPostProcessor {
public Object postProcessBeforeInitialization(Object bean, String beanName) throws BeansException {
System.out.println("==>在初始化之前");
return BeanPostProcessor.super.postProcessBeforeInitialization(bean, beanName);
}
public Object postProcessAfterInitialization(Object bean, String beanName) throws BeansException {
System.out.println("==>在初始化之后");
return BeanPostProcessor.super.postProcessAfterInitialization(bean, beanName);
}
}
<!--applicationContext_lifeCycle.xml-->
...
<bean class="com.mts.processor.PostProcessor"/>
...
第六章 DI
给对象赋值
第一节 XML为对象的属性赋值
6.1.1 对象入参的两种方式
- 通过构造方法入参
<constructor-arg>
| 属性 | 作用 |
|---|---|
| name | 给这个对象的哪个属性赋值 |
| value | 值是什么 |
| ref | 引用(当这个属性, 不是字面量值的时候用到) |
注意⚠️: ①该标签是通过有参构造注入的(没有对应的有参构造会报错)
示例代码: 涉及有参构造重载时的操作
/*Student.java*/
public Student(Integer stuNumber, String stuName) {
    System.out.println("第一种构造方法 Integer stuNumber, String stuName");
    StuNumber = stuNumber;
    StuName = stuName;
}

public Student(String stuName, Integer stuNumber) {
    System.out.println("第二种构造方法 String stuName, Integer stuNumber");
    StuNumber = stuNumber;
    StuName = stuName;
}


<!--applictaionContext.xml-->
<!--情况一:没有重载(用name指定入参)-->
<bean id="StuYouCan" class="com.mts.pojo.Student">
    <constructor-arg name="stuName" value="YouCan"/>
    <constructor-arg name="stuNumber" value="1000"/>
</bean>

<!--情况二:有重载(写的顺序决定)-->
<bean id="StuYouCan1" class="com.mts.pojo.Student"> <!--第一种构造-->
    <constructor-arg value="1"/>
    <constructor-arg value="YouCan1" />
</bean>
<bean id="StuYouCan1" class="com.mts.pojo.Student"> <!--第二种构造-->
    <constructor-arg value="YouCan2"/>
    <constructor-arg value="2" />
</bean>
- 通过xxxSet方法入参
<property>
属性: 同上
注意⚠️: 此时Student这个类一定要有无差构造方法+对应的set方法, 否则报错
示例代码:
<bean id="StuMingTingSheng" class="com.mts.pojo.Student">
    <property name="stuName" value="明廷盛"/>
    <property name="stuNumber" value="2240110323"/>
</bean>
6.1.2 字面量值入参
字面量数值: 基本数据类型(int), 包装类(Integer), String
语法: 使用
<property>标签的value属性或value标签示例代码:
<!--value属性-->
<property name="stuName" value="明廷盛"/>
<!--value标签: 有特殊字符(像'<','>)需要用到`<![CDATA[]]>`区域-->
<property name="stuName">
    <value><![CDATA[<明廷盛>🐂🍺]]></value>
</property>
6.1.3 非字面量值入参
非字面量值: 除了字面量都是非字面量
语法: ①使用
<property>标签的ref属性 ②使用级联 ③使用内部bean注意⚠️: 所有的对象想要实例化, 必须使用
<bean>标签;所以就算级联也得先引用一个空bean示例代码:
<!--applicationContext.xml-->
<!--方式一: 使用`ref`属性-->
<bean id="deptMing" class="com.mts.pojo.Dept">
    <property name="deptId" value="3"/>
    <property name="deptName" value="开发部"/>
</bean>

<bean id="employeeMing" class="com.mts.pojo.Employee">
    <property name="id" value="1"/>
    <property name="lastName" value="Ming"/>
    <property name="email" value="111@qq.com"/>
    <property name="deptId" value="3"/>
    <property name="salary" value="32.32"/>
    <property name="dept" ref="deptMing"/>
</bean>

<!--方式二: 使用级联-->
<bean id="deptCaiGou" class="com.mts.pojo.Dept"/>

<bean id="employeeLv" class="com.mts.pojo.Employee">
    <property name="id" value="2"/>
    <property name="lastName" value="Lv"/>
    <property name="email" value="222@qq.com"/>
    <property name="deptId" value="3"/>
    <property name="salary" value="569.4"/>
    <property name="dept" ref="deptCaiGou"/>
    <!--级联修改-->
    <property name="dept.deptName" value="开发部" />
    <property name="dept.deptId" value="3"/>
</bean>

<!--方式三: 使用内部bean-->
<bean id="employeePan" class="com.mts.pojo.Employee">
    <property name="id" value="3"/>
    <property name="lastName" value="Pan"/>
    <property name="email" value="222@qq.com"/>
    <property name="deptId" value="3"/>
    <property name="salary" value="569.4"/>
    <!--内部bean-->
    <property name="dept">
        <bean class="com.mts.pojo.Dept">
            <property name="deptName" value="秘书部"/>
            <property name="deptId" value="3"/>
        </bean>
    </property>
</bean>
6.1.4 List集合
语法: ①内部list(使用
<list>标签) ②外部引用list(ref一个<util:list>标签)注意⚠️: 使用
<util:>标签需要导包xmlns:util="http://www.springframework.org/schema/util"示例代码:
<!--applicationContext.xml-->
<!--方式一: 内部List-->
<bean id="deptQian" class="com.mts.pojo.Dept">
    <property name="deptId" value="10"/>
    <property name="deptName" value="前台部"/>
    <property name="employeeList">
        <list>
            <ref bean="employeeMing"/>
            <ref bean="employeeLv"/>
            <ref bean="employeePan"/>
        </list>
    </property>
</bean>


<!--方式二: 外部引用list-->
<util:list id="deptQianList"> <!--需要导util的包-->
    <ref bean="employeeMing"/>
    <ref bean="employeeLv"/>
    <ref bean="employeePan"/>
</util:list>

<bean id="deptQian2" class="com.mts.pojo.Dept">
    <property name="deptId" value="10"/>
    <property name="deptName" value="前台部"/>
    <property name="employeeList" ref="deptQianList">
    </property>
</bean>
6.1.5 Map映射
- 语法: ①内部map(使用
<map>和<entry>标签) ②外部引用list(ref一个<util:map>标签) - 示例代码:
<!--applicationContext.xml-->
<!--方式一: 内部Map-->
<bean id="deptHou" class="com.mts.pojo.Dept">
    <property name="deptId" value="10"/>
    <property name="deptName" value="前台部"/>
    <property name="employeeMap">
        <map>
            <entry key="01" value-ref="employeeMing"/>
            <entry key="02" value-ref="employeeLv"/>
        </map>
    </property>
</bean>

<!--方式二: 外部Map-->
<util:map id="deptHouMap">
    <entry key="01" value-ref="employeeMing"/>
    <entry key="02" value-ref="employeeLv"/>
</util:map>

<bean id="deptHou2" class="com.mts.pojo.Dept">
    <property name="deptId" value="10"/>
    <property name="deptName" value="前台部"/>
    <property name="employeeMap" ref="deptHouMap">
    </property>
</bean>
6.1.6 第三方的Bean
和上面的一样, 只是需要注意**①需要第三方的Bean这个class是什么** ②property的name属性是什么
- 语法: 导入property文件, 使用
<context:property-placeholder>标签, 用${key}引入值 - 示例代码: 引入外部properties文件, 装配德鲁伊的数据库连接池
<!--applicationcontext.xml-->
<context:property-placeholder location="classpath:db.properties"/>

<bean id="dataSource" class="com.alibaba.druid.pool.DruidDataSource">
    <property name="driverClassName" value="${db.driverClassName}"/>
    <property name="url" value="${db.url}"/>
    <property name="username" value="${db.username}"/>
    <property name="password" value="${db.password}"/>
</bean>
6.4.7 通过XML自动装配非字面量值
- 语法: 在
<bean>标签中指定auto-wire属性
| auto-wire属性 | 规则 |
|---|---|
| byName | 如果属性名与标签的bean ld属性唯一匹配,则自动装配 |
| byType | 对象中属性类型与bean标签的class属性唯一匹配,则自动装配 |
注意⚠️:
- 注意是唯一匹配, 如果匹配0个或多个都会报错
- 基于XML方式的自动装配,只能装配非字面量数值
- 基于xml自动装配,底层使用set注入
- 不建议使用XML的自动装配, 建议使用注解
示例代码: 模拟三层, 在serviceImpl中要创建daoImpl对象, 我们不new, 使用自动装配来完成
/*DeptServiceImpl.java*/
public class DeptServiceImpl implements DeptService {
    //以前都是new出来,但现在学了spring不允许在这new了,去xml自动装配
    private  DeptDao deptDao;
    //XML的自动装配也是需要set方法的
	//省略 ...DeptDao的get和set方法
}
<!--applicationContext.xml-->
<bean id="deptDao" class="com.mts.dao.impl.DeptDaoImpl"/>
<!--自动装配-->
<bean id="DeptService" class="com.mts.service.impl.DeptServiceImpl" autowire="byName"/>

<!--手动装配-->
<bean id="DeptService" class="com.mts.service.impl.DeptServiceImpl">
    <property name="deptDao" ref="deptDao"/> <!--如果不用自动装配, 需要像上面一样手动ref-->
</bean>
第二节 注解为对象的属性赋值
6.2.1 非字面量值自动装配 @Autowired
- 语法: 在需要自动装配的成员变量上方加上
@Autowired注解
- 底层装配原理: 反射机制
- 底层装配规则: 先byType后byName (byType唯一匹配装配成功; 多个匹配通过byName筛选; 没有匹配报错)
- 注意⚠️: 成功装配的大前提是容器中有这个Bean
- 示例代码:
/*DeptServiceImpl.java*/
private DeptDao deptDao;
6.2.2 非字面量值指定装配@Qualifier
作用: 配合@Autowired一起使用,将指定beanId名称装配到属性中
注意⚠️: 不能单独使用, 需要与
@Autowired一起使用示例代码:
/*DeptServiceImpl.java*/
/*名字不匹配,用Qualifier手动指定*/
private DeptDao deptDao2;
6.2.3 字面量值 @Value
- 作用:装配对象中属性【字面量数值】
- 示例代码:
/*Dept.java*/
public class Dept {
Integer deptId;
String deptName;
}
第七章 AOP
OOP:Object-Oriented Programming,面向对象编程
AOP:Aspect-Oriented Programming,面向切面编程【面向对象一种补充】>
- 优势:解决代码分散问题, 解决代码混乱问题
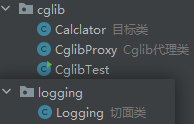
第一节 JDK、Cglib实现动态代理
7.1.1 jdk动态代理
- 适用: 存在接口, 为其实现类进行代理
- 底层: 代理类实现接口
- 示例代码: 需求: 给Calclator这个类中的每个方法运算前后增加日志(使用代理)

/*Calc*/
public interface Calc {
    int add(int a, int b);
    int sub(int a, int b);
    int mul(int a, int b);
    double div(int a, int b);
}
/*CalcImpl*/
public class CalcImpl implements Calc {
public int add(int a, int b) { return a + b;}
public int sub(int a, int b) {return a - b;}
public int mul(int a, int b) {return a * b;}
public double div(int a, int b) {return (double) a / (double) b;}
}
/*JdkProxy*/
public class JdkProxy {
private Object target;
// 创建这个类必须要初始化目标类
public JdkProxy(Object target) {
this.target = target;
}
// 获取代理类
public Object getTargetProxy() {
Object resProxy = Proxy.newProxyInstance(
target.getClass().getClassLoader(),// 目标类的类加载器
target.getClass().getInterfaces(), // 目标类实现的接口
new InvocationHandler() { // 如何代理目标类
/**
*
* @param o: 代理类
* @param method: 目标类中哪个方法
* @param objects: 目标类中该方法的参数
* @return 该方法的返回值
* @throws Throwable 异常抛出
*/
public Object invoke(Object o, Method method, Object[] objects)
throws Throwable {
Logging.beforeCalculate(method.getName(), objects); // 执行方法前
Object res = method.invoke(target, objects); // 执行方法
Logging.afterCalculate(method.getName(), res); // 执行方法后
return res;
}
});
return resProxy;
}
}
/*测试代理类*/
public class JdkTest {
    public static void main(String[] args) {
        // 生成JDK底层代理类 放在main下才生效
        // System.setProperty("sun.misc.ProxyGenerator.saveGeneratedFiles","true");
        JdkProxy jdkProxy = new JdkProxy(new CalcImpl());
        Calc CalcProxy = (Calc) jdkProxy.getTargetProxy();
        double add = CalcProxy.add(1, 2);
    }
}
7.1.2 cglib动态代理
- 适用: 是否实现接口都可以用
- 底层: 继承目标类, 完成代理
- 示例代码: 需求: 给Calclator这个类中的每个方法运算前后增加日志(使用代理)
<!--pom.xml-->
<!--cglib-->
<dependency>
    <groupId>cglib</groupId>
    <artifactId>cglib</artifactId>
    <version>2.2.2</version>
</dependency>
/*Calclator*/
public class Calclator{
    public int add(int a, int b) {
        int res = a + b;
        mul(a,b); // 测试调用本类是否有增强
        return res;
    }
    public int sub(int a, int b) {return a - b;}
    public int mul(int a, int b) {return a * b;}
    public double div(int a, int b) {return (double) a / (double) b;}
}
public class CglibProxy {
private Object target;
public CglibProxy(Object target) {this.target = target;}
public Object getTargetProxy() {
Enhancer enhancer = new Enhancer(); // Enhancer用于生成代理类
enhancer.setSuperclass(target.getClass()); // 告知目标类
// 告知需求
enhancer.setCallback(new MethodInterceptor() {
/**
* @param o: 代理类
* @param method: 目标类中哪个方法
* @param objects: 目标类中该方法的参数
* @param methodProxy: cglib给我们的执行函数的对象
* @return 该方法的返回值
* @throws Throwable 异常抛出
*/
public Object intercept(Object o, Method method, Object[] objects,
MethodProxy methodProxy) throws Throwable {
Logging.beforeCalculate(method.getName(), objects); // 执行方法前
// 目标类中方法内部调用 会有增强
// Object res = methodProxy.invokeSuper(o, objects);
// 目标类中方法内部调用 不会有增强
Object res = methodProxy.invoke(target, objects); // 执行方法
Logging.afterCalculate(method.getName(), res); // 执行方法后
return res;
}
});
Object targetProxy = enhancer.create(); // 生成代理类
return targetProxy;
}
}
/*CglibTest*/
public class CglibTest {
    public static void main(String[] args) {
        // 生成Cglib底层代理类 放在main下才生效
		// System.setProperty(DebuggingClassWriter.DEBUG_LOCATION_PROPERTY, "./");

        CglibProxy cglibProxy = new CglibProxy(new Calclator());
        Calclator targetProxy = (Calclator) cglibProxy.getTargetProxy();
        int add = targetProxy.add(1, 2);
    }
}
第二节 Spring Framework实现动态代理
①Spring AOP是用的AspectJ框架实现的
②Spring 实现AOP用的底层就是JDK(当目标类实现接口时)和Cglib(目标类没有实现接口时)
7.2.1 Spring中AOP相关术语
- 横切关注点:非核心业务代码【日志】,称之为横切关注点
- 切面(Aspect):将横切关注点提取到类中,这个类称之为切面类就是像日志这样的工具类
- 通知(Advice):将横切关注点提取到类中之后,横切关注点更名为:通知
- ==目标(Target)== :目标对象,指的是需要被代理的对象【实现类(CalcImpl)】
- 代理(Proxy):代理对象可以理解为:中介
- 连接点(Joinpoint):通知方法需要指定通知位置,这个位置称之为:连接点【通知之前】
- ==切入点(pointcut)==:通知方法需要指定通知位置,这个位置称之为:切入点【通知之后】
第三节 Spring AOP使用步骤
7.3.1 STEP1: pom.xml配置
- Spring的AOP是AspectJ和Spring联合整合的;
<!--pom.xml-->
<!--spring-aspects的jar包-->
<dependency>
    <groupId>org.springframework</groupId>
    <artifactId>spring-aspects</artifactId>
    <version>5.3.1</version>
</dependency>
7.3.2 STEP2: applicationContext.xml编写
<!--applicationContext.xml-->
<!--开启组件扫描-->
<context:component-scan base-package="com.atguigu"/>
<!--开启AspectJ注解支持-->
<aop:aspectj-autoproxy/>
7.3.3 STEP3: 为切面类添加注解 @Aspect
- 必要的
@Component: 添加为bean@Aspect: 标注当前类是一个切面类
- 可选的
@EnableAspectJAutoProxySpring AOP补档: 使用场景: ①想用cglib ②想调用代理类的方法而不是目标类的
| 属性 | 默认值 | 作用 |
|---|---|---|
| proxyTargetClass | false | 是否强制使用cglib动态代理 |
| exposeProxy | false | 是否暴露代理类 |
@Order: 使用场景: 当目标类有多个增强时, 切面类中这个注解中value越小的,越先通知
public class Logging {
}
7.3.4 STEP4: 在切面类中编写通知注解
// 添加bean
// 标注当前类是一个切面类
public class Logging {
public void pointCut() {}
public static Object around(ProceedingJoinPoint proceedingJoinPoint) {
Object res=null;
try {
System.out.println("before");
res = proceedingJoinPoint.proceed();
System.out.println("after");
}catch (Throwable e){
System.out.println("error"+e);
}finally {
System.out.println("complete!");
}
return res;
}
}
第四节 通知注解
7.4.1 通知注解—切入点表达式 execution
- 语法:
"execution(权限修饰符 返回值类型 包名.类名.方法名(参数类型) )") - 通配符:
| 通配符 | 可以代替 |
|---|---|
* |
可以代表任意 ①权限修饰符 ②返回值类型 ③包名 ④类名 ⑤方法名 ⚠️需要空格分开 |
.. |
可以代表任意参数类型及参数个数 |
- 示例代码: 以下举例切入点表达具体切入的点
// ①com.mts.aop包中的CalcImpl类的pulic的入参顺序为int,int的add方法
// ②com.mts.aop包中的CalcImpl类的所有方法 [常用]
// ③ com.example.service 包中除了以 Service 结尾的类的所有方法。
7.4.2 通知注解—重用切入点表达式 @PointCut
- 语法: 使用
@PointCut注解定义一个方法,该方法将包含一个切入点表达式。这个方法通常不包含实现,因为它只是用来声明切入点。 - 示例代码:
// 定义切入点
public void myPointCut(){}
// 引用切入点
public void beforeMethod(JoinPoint joinPoint){}
7.4.3 通知注解—切入点对象 JoinPoint
- 语法: 在使用以下四大注解时(前置通知, 返回通知, 异常通知, 后置通知), 方法必须入参
JoinPoint对象
| JoinPoint对象常用API | 作用 |
|---|---|
| joinPoint.getSignature(); String | 获取方法签名【方法签名=方法名+参数列表】 |
| joinPoint.getSignature().getName(); String | 通过方法签名, 获取方法名称 |
| joinPoint.getArgs(); Object[] | 获取参数列表 |
7.4.4 通知注解—前置通知 @Before
- 语法:
@Before目标方法执行之前执行特定的逻辑【如目标方法中有异常,会执行】 - 示例代码: 需求: 在执行目标方法前, 打印参数列表
public void beforeMethod(JoinPoint joinPoint){
String methodName = joinPoint.getSignature().getName();//获取方法名称
Object[] args = joinPoint.getArgs(); //获取参数
System.out.println("==>Calc中"+methodName+"方法(),参数:"+ Arrays.toString(args));
}
7.4.5 通知注解—返回通知 @AfterReturnning
- 语法:
@AfterReturnning目标方法执行之后执行特定的逻辑【如目标方法中有异常,不执行】
| 属性 | 作用 |
|---|---|
| returning String | 目标方法的返回值 |
- 注意⚠️: ①returning属性与入参中参数名一致 (该属性并不是一定要有)
- 示例代码: 需求: 在执行目标方法后, 打印执行结果
public void afterReturnning(JoinPoint joinPoint,Object rs){
String methodName = joinPoint.getSignature().getName();//获取方法名称
System.out.println("【返回通知】==>Calc中"+methodName+"方法,返回结果执行!结果:"+rs);
}
7.4.6 通知注解—异常通知 @AfterThrowing
- 语法:
@AfterThrowing目标方法出现异常时执行【如目标方法中无异常,不执行】
| 属性 | 作用 |
|---|---|
| throwing String | 目标方法执行过程中出现的异常 |
- 注意⚠️: ①throwing属性值与入参参数名一致 (该属性并不是一定要有)
- 示例代码: 需求: 有bug, 打印异常信息
public void afterThrowing(JoinPoint joinPoint, Exception ex){
String methodName = joinPoint.getSignature().getName();//获取方法名称
System.out.println("【异常通知】==>Calc中"+methodName+"方法,出现异常时执行!异常:"+ex);
}
7.4.7 通知注解—后置通知@After
- 语法:
@After目标方法所有通知执行之后执行【如目标方法中有异常,会执行】 - 示例代码: 需求: 无论如何, 打印执行结果
public void afterMethod(JoinPoint joinPoint){
String methodName = joinPoint.getSignature().getName();//获取方法名称
Object[] args = joinPoint.getArgs(); //获取参数
System.out.println("==>Calc中"+methodName+"方法,之后执行!"+Arrays.toString(args));
}
7.4.8 通知注解—环绕通知@Around
- 语法:
@Around前面四个通知的整合 - 注意⚠️: ①参数中必须使用
ProceedingJoinPoint②必须将返回结果, 作为返回值(void🔙null) - 总结: 前置通知–>(异常通知/返回通知)–>后置通知【中间执行哪个看是否有异常】
- 示例代码: 需求:整合前四个
public Object aroundMethod(ProceedingJoinPoint pjp){
String methodName = pjp.getSignature().getName(); //获取方法名称
Object[] args = pjp.getArgs(); //获取参数
Object rs = null; //定义返回值
try {
System.out.println("【前置通知】");
rs = pjp.proceed(); //调用目标方法
System.out.println("【返回通知】"); //返回通知【有异常不执行】
} catch (Throwable throwable) {
System.out.println("【异常通知】"+ throwable);
} finally {
System.out.println("【后置通知】");
}
return rs;
}
第八章 JDBCTemplate
Spring提供的JdbcTemplate是一个小型持久化层框架,简化Jdbc代码。之前学的Mybatis是一个半自动化的ORM持久化层框架
第一节 JdbcTemplate使用步骤
8.1.1 STEP1: pom.xml配置
<!--spring-jdbc∈spring-orm-->
<dependency>
    <groupId>org.springframework</groupId>
    <artifactId>spring-orm</artifactId>
    <version>5.3.1</version>
</dependency>
<!--导入druid的jar包-->
<dependency>
    <groupId>com.alibaba</groupId>
    <artifactId>druid</artifactId>
    <version>1.1.10</version>
</dependency>
<!--导入mysql的jar包-->
<dependency>
    <groupId>mysql</groupId>
    <artifactId>mysql-connector-java</artifactId>
    <version>5.1.37</version>
</dependency>
8.1.2 STEP2: applicationContext.xml配置
- 装配DruidDataSource的Bean
- 装配JdbcTemplate 的Bean
- 注意: url后面的serverTimZone=UTC必须要写!!!
#db.properties
#key=value
db.driverClassName=com.mysql.cj.jdbc.Driver
db.url=jdbc:mysql://localhost:3306/test_mybatis?useSSL=false&allowPublicKeyRetrieval=true&serverTimezone=UTC
db.username=root
db.password=root
<!--applicationContext.xml-->
<!--引入properties文件-->
<context:property-placeholder location="classpath:db.properties"/>
<!--装配DruidDataSource-->
<bean id="dateSource" class="com.alibaba.druid.pool.DruidDataSource">
    <property name="driverClassName" value="${db.driverClassName}"/>
    <property name="url" value="${db.url}"/>
    <property name="username" value="${db.username}"/>
    <property name="password" value="${db.password}"/>
</bean>
<!--装配JdbcTemplate-->
<bean id="jdbcTemplate" class="org.springframework.jdbc.core.JdbcTemplate">
    <property name="dataSource" ref="dateSource"/>
</bean>
第二节 JdbcTemplate的常用API
| 常用API | 作用 | |
|---|---|---|
update (String sql, Object... args) int |
增删改 | |
batchUpdate (String sql,List<Object[]> args) int |
批量增删改 | |
queryForObject (String sql,Class<T> clazz,Object... args) <T> |
查询单个数值 | |
queryForObject (String sql,RowMapper<T> rm,Object... args) <T> |
查询单个对象 | |
query (String sql,RowMapper<T> rm,Obejct... args) List<T> |
查询多个对象 |
8.2.1 增删改
- 语法:
jdbcTemplate.update(String sql, Object... args) - 注意⚠️:①JdbcTmplate默认是自动提交事务的
- 示例代码:
// 增(返回值是操作的行数)
String sql = "insert into tbl_dept(dept_name,dept_id) values(?, ?)";
jdbcTemplate.update(sql, "后勤部",2);

// 删
sql = "delete from tbl_dept where dept_id = ?";
jdbcTemplate.update(sql, 4);

// 改
sql = "update tbl_dept set dept_name = ? where dept_id=?";
jdbcTemplate.update(sql, "后勤部", 2);
8.2.2 批量 增删改
- 语法:
jdbcTemplate.batchUpdate(String sql,List<Object[]> args) - 示例代码:
// 批量增删改 (批量插入员工信息)
sql = "insert into tbl_employee(last_name, email, salary) values (?,?,?)";
List<Object[]> employees = new ArrayList<>();
employees.add(new Object[]{"zhangSan", "123@ww.ecom", 23.3});
employees.add(new Object[]{"liSi", "13241@ww.ecom", 33.3});
employees.add(new Object[]{"wangWu", "423@ww.ecom", 383.3});

jdbcTemplate.batchUpdate(sql, employees);
8.2.3 查询单个数值
- 语法:
jdbcTemplate.queryForObject(String sql,Class clazz,Object... args) - 示例代码:
// 查询单个数值(查询员工数量)
public Integer getNumberOfEmployees() {
    sql = "select count(*) from tbl_employee";
    Integer employeeNum = jdbcTemplate.queryForObject(sql, Integer.class);
    return employeeNum;
}
8.2.4 查询单个对象
- 语法:
jdbcTemplate.queryForObject(String sql,RowMapper<T> rm,Object... args) - 示例代码:
// 查询单个对象(查询id为1的员工信息)
public Employee findEmployeeById(Integer id) {
    sql = "select id, last_name, email, salary from tbl_employee where id = ?";
    // 创建RowMapper<T>
    RowMapper<Employee> rowMapper = new BeanPropertyRowMapper<>(Employee.class);
    Employee employee = jdbcTemplate.queryForObject(sql, rowMapper, 1);
    System.out.println(employee);
}
8.2.5 查询多个对象
- 语法:
jdbcTemplate.query(String sql,RowMapper<T> rm,Obejct... args) - 示例代码:
// 查询多个对象(查询所有员工信息)
public List<Employee> findAll() {
    sql = "select * from tbl_employee";
    RowMapper<Employee> rowMapper2 = new BeanPropertyRowMapper<>(Employee.class);
    List<Employee> employeeList = jdbcTemplate.query(sql, rowMapper2);
    return employeeList;
}
第九章 Spring声明式事务
Spring的声明式事务是使用AOP管理事务, 解决了传统编程式事务的①事务代码分散②事务代码混乱 的问题
第一节 Spring声明式事务使用步骤
9.1.1 STEP1: pom.xml配置
- 导的包就是Spring AOP的包
<dependency>
  <groupId>org.springframework</groupId>
  <artifactId>spring-aspects</artifactId>
  <version>5.3.1</version>
</dependency>
9.1.2 STEP2: applicationContext.xml配置
- 装配事务管理器
- 开启事务注解支持
<!--装配事务管理器-->
<bean id="transactionManager" class="org.springframework.jdbc.datasource.DataSourceTransactionManager">
  <property name="dataSource" ref="dataSource"/>
</bean>
<!--开启事务注解支持
transaction默认值是transactionManager, 如果上面的id改了, 需要指定否则可以省略-->
<tx:annotation-driven transaction-manager="transactionManager"/>
9.1.3 STEP3: 为需要事务的方法添加注解 @Transactional
- 语法: 使用
@Transactional注解指明当前方法是开启事务的 - 注意: 因为是基于AOP实现, 所以本质上是”代理类”帮我们完成的, 分清楚是cglib还是jdk, 在创建对象时是实现类还是接口
- 示例代码: 需求: 买书: 检查book价格->修改库存->修改余额
public void purchase(String username, String isbn) {
Integer price = bookShopDao.findBookPriceByIsbn(isbn); // 1.查询book价格
bookShopDao.updateBookStock(isbn); // 2.修改库存
bookShopDao.updateUserAccount(username, price); // 3.修改余额
}
第二节 @Transactional注解的属性
| 属性 | 作用 |
|---|---|
| Propagation | 事务传播行为 |
| Isolation | 事务的隔离等级 |
| timeout | 事务超时时间(单位:s) |
| readOnly | 事务只读 |
| rollbackFor/noRollbackFor | 事务的回滚 |
9.2.1 事务传播行为【Propagation】
- 概念: 当事务方法被另一个事务方法调用时,必须指定事务应该如何传播。
- 人话: 在事务A中的子事务B开启时, 是否重新挂起事务, 还是在原有的事务中继续运行
- 注意⚠️:①比如你希望, 当运行到事务A中的子事务B时, 重新挂起事务, 是在事务B上面的@Transactional中写REQUIRES_NEW属性, 而不是A事务
- 7种事务传播行为
| 传播属性 | 描述 |
|---|---|
| REQUIRED | 如果有事务在运行,当前的方法就在这个事务内运行;否则就启动一个新的事务,并在自己的事务内运行。 |
| REQUIRES_NEW | 当前的方法*必须*启动新事务,并在自己的事务内运行;如果有事务正在运行,应该将它挂起。 |
| SUPPORTS | 如果有事务在运行,当前的方法就在这个事务内运行,否则可以不运行在事务中。 |
| NOT_SUPPORTED | 当前的方法不应该运行在事务中,如果有运行的事务将它挂起 |
| MANDATORY | 当前的方法必须运行在事务中,如果没有正在运行的事务就抛出异常。 |
| NEVER | 当前的方法不应该运行在事务中,如果有正在运行的事务就抛出异常。 |
| NESTED | 如果有事务正在运行,当前的方法就应该在这个事务的嵌套事务内运行,否则就启动一个新的事务,并在它自己的事务内运行。 |
- 图解:

- 示例代码: 需求: 两种使用场景, 对应两种事务的传播行为
/**
1. 去结账时判断余额是否充足,余额不足:一本书都不能卖
@Transactional(propagation=Propagation.REQUIRED)
2. 去结账时判断余额是否充足,余额不足:最后导致余额不足的那本书,不让购买
@Transactional(propagation=Propagation.REQUIRES_NEW)
*/
public void purchase(String username, String isbn) {
Integer price = bookShopDao.findBookPriceByIsbn(isbn); // 1.查询book价格
bookShopDao.updateBookStock(isbn); // 2.修改库存
bookShopDao.updateUserAccount(username, price); // 3.修改余额
}
9.2.2 事务隔离级别【Isolation】(MySql中)
- MySql 默认是READ_COMMITTED
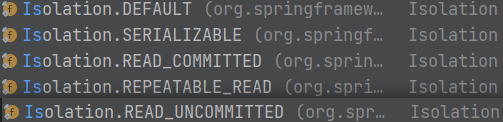
| Isolation | 名称 | 级别 | 脏读 | 不可重复读 | 幻读 |
|---|---|---|---|---|---|
| READ_UNCOMMITTED | 读未提交 | 1 | ✔ | ✔ | ✔ |
| READ_COMMITTED | 读已提交 | 2 | ✖ | ✔ | ✔ |
| REPEATEABLE_READ | 可重复读 | 4(字段锁) | ✖ | ✖ | ✔ |
| SERIALIZABLE | 串行化 | 8(表锁) | ✖ | ✖ | ✖ |
- 脏读(Dirty Read)
- 场景:事务A读取了事务B未提交的数据。
- 例子:
- 事务A读取账户余额为1000元。
- 同时,事务B开始修改账户余额,将1000元改为2000元,但尚未提交。
- 事务A读取到账户余额为2000元。
- 如果事务B回滚,事务A读取到的2000元就是错误的。
- 不可重复读(Non-repeatable Read)
- 场景:在一个事务中,多次读取同一数据集合时,由于其他事务的更新,导致两次读取的结果不一致。
- 例子:
- 事务A读取账户余额为1000元。
- 同时,事务B将账户余额从1000元改为2000元,并提交了更改。
- 事务A再次读取账户余额,发现变为2000元。
- 幻读(Phantom Read)
- 场景:在一个事务中,读取某个范围内的记录时,由于其他事务插入了新的记录,导致再次读取时发现有之 前未见过的新记录。
- 例子:
- 事务A读取账户余额大于1000元的所有账户。
- 事务B插入一个新的账户,余额为1500元,并提交了更改。
- 事务A再次读取账户余额大于1000元的所有账户,发现新增了一个账户,余额为1500元。
9.2.3 事务超时【timeout】
- 概念: 由于事务可以字在行或表上获得锁🔒, 因此会占用过多资源, 对性能产生影响
- 作用: 设置事务的超时时间, 到达指定时间后会强制回滚
- 注意⚠️: 单位为秒(s)
9.2.4 事务的只读【readOnly】
- 概念: 当
readOnly属性设置为true时,这表明被注解的方法或类中的所有方法只涉及数据的读取操作,不涉及数据的修改。
9.2.5 事务的回滚【rollbackFor/noRollbackFor】
- 概念: 输入出现哪种错/不出现那种错时回滚or不回滚
- Title: 1.SpringFramework学习
- Author: 明廷盛
- Created at : 2026-02-12 01:17:04
- Updated at : 2025-02-15 16:20:00
- Link: https://blog.20040424.xyz/2026/02/12/😼Java全栈工程师/第三部分 SSM/1.SpringFramework学习/
- License: All Rights Reserved © 明廷盛